HTTP Request
FastGPT HTTP Request node overview
Characteristics
- Can be added multiple times
- Manual configuration
- Trigger-based execution
- Core of core modules
Overview
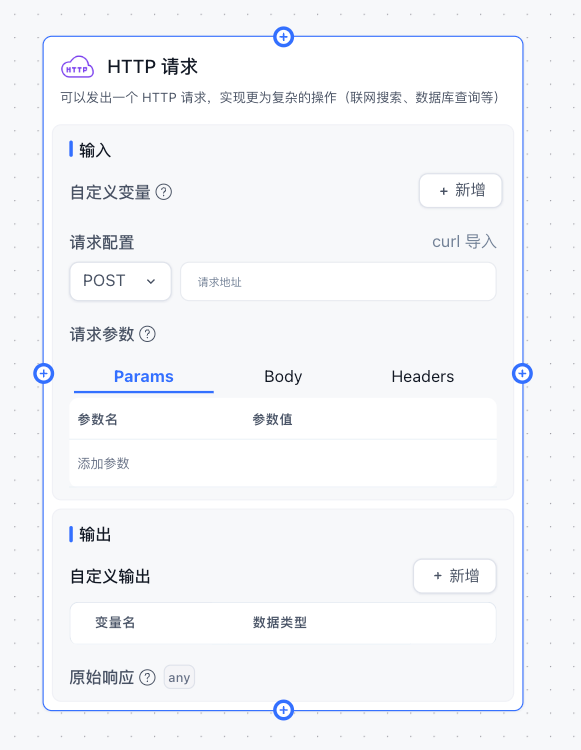
The HTTP node sends an HTTP request to a specified URL. It works similarly to tools like Postman and ApiFox.
- Params are query parameters, commonly used in GET requests.
- Body is the request body, commonly used in POST/PUT requests.
- Headers are request headers for passing additional information.
- Custom variables can receive outputs from upstream nodes.
- All 3 data types support variable references via
{{}}. - The URL also supports
{{}}variable references. - Variables come from
global variables,system variables, andupstream node outputs.
Parameter Structure
System Variables
Hover over the question mark next to Request Parameters to see available variables.
- appId: Application ID
- chatId: Current conversation ID (not available in test mode)
- responseChatItemId: Response message ID in the current conversation (not available in test mode)
- variables: Global variables for the current conversation
- cTime: Current time
- histories: Chat history (defaults to max 10 entries, length is not configurable)
Params, Headers
Usage is the same as Postman and ApiFox.
Use {{key}} to reference variables. For example:
| key | value |
|---|---|
| appId | {{appId}} |
| Authorization | Bearer {{token}} |
Body
Only takes effect with certain request types.
Write a custom JSON body and use {{key}} to reference variables. For example:
{
  "string": "字符串",
  "number": 123,
  "boolean": true,
  "array": [1, 2, 3],
  "obj": {
    "name": "FastGPT",
    "url": "https://fastgpt.io"
  }
}
When referencing a string in the Body, wrap it in quotes: "{{string}}".
{
  "string": "{{string}}",
  "token": "Bearer {{string}}",
  "number": {{number}},
  "boolean": {{boolean}},
  "array": [{{number}}, "{{string}}"],
  "array2": {{array}},
  "object": {{obj}}
}
{
"string": "字符串",
"token": "Bearer 字符串",
"number": 123,
"boolean": true,
"array": [123, "字符串"],
"array2": [1, 2, 3],
"object": {
"name": "FastGPT",
"url": "https://fastgpt.io"
}
}Extracting Return Values
As shown in the image, FastGPT lets you add multiple return values. These don't represent the raw API response -- they define how to parse the API response. You can use JSON path syntax to extract values from the response.
Syntax reference: https://github.com/JSONPath-Plus/JSONPath?tab=readme-ov-file
{
  "message": "测试",
  "data":{
      "user": {
        "name": "xxx",
        "age": 12
      },
      "list": [
        {
          "name": "xxx",
          "age": 50
        },
        [{ "test": 22 }]
      ],
      "psw": "xxx"
  }
}
{
"$.message": "测试",
"$.data.user": { "name": "xxx", "age": 12 },
"$.data.user.name": "xxx",
"$.data.user.age": 12,
"$.data.list": [ { "name": "xxx", "age": 50 }, [{ "test": 22 }] ],
"$.data.list[0]": { "name": "xxx", "age": 50 },
"$.data.list[0].name": "xxx",
"$.data.list[0].age": 50,
"$.data.list[1]": [ { "test": 22 } ],
"$.data.list[1][0]": { "test": 22 },
"$.data.list[1][0].test": 22,
"$.data.psw": "xxx"
}Configure the key to extract values from FastGPT's parsed format, following standard JavaScript object access rules. For example:
- To get the
messagecontent, set thekeytomessage. - To get the user's name, set the
keytodata.user.name. - To get the second element in the list, set the
keytodata.list[1]. If you select string as the output type, it will automatically return the JSON string[ { "test": 22 } ].
Auto-format Output
Starting from FastGPT v4.6.8, output formatting was added, primarily converting JSON to string. If you select string as the output type, the HTTP node will convert the corresponding key's value to a JSON string. This lets you pipe HTTP output directly into a Text Processing node, append appropriate prompts, and feed the result into AI Chat.
The HTTP node is extremely versatile. You can integrate public APIs to extend your workflow capabilities.
If you don't want to deploy additional services, use Laf to quickly develop and publish APIs -- write and ship instantly with no deployment needed.
Laf HTTP Integration Example
Here is a POST request example written in Laf:
import cloud from '@lafjs/cloud'
const db = cloud.database()

type RequestType = {
  appId: string;
  appointment: string;
  action: 'post' | 'delete' | 'put' | 'get'
}

export default async function (ctx: FunctionContext) {
  try {
    // Get parameters from body
    const { appId, appointment, action } = ctx.body as RequestType

    const parseBody = JSON.parse(appointment)
    if (action === 'get') {
      return await getRecord(parseBody)
    }
    if (action === 'post') {
      return await createRecord(parseBody)
    }
    if (action === 'put') {
      return await putRecord(parseBody)
    }
    if (action === 'delete') {
      return await removeRecord(parseBody)
    }


    return {
      response: "Error"
    }
  } catch (err) {
    return {
      response: "Error"
    }
  }
}
Use Cases
The HTTP node enables unlimited extensibility, such as:
- Database operations
- External data source calls
- Web searches
- Sending emails
- ....
Related Examples
File Updated