
Deploy with Sealos
Deploy FastGPT and its required database services on Sealos Cloud with one click.
Deploying FastGPT on Sealos Cloud provisions the FastGPT app, MongoDB, PostgreSQL (pgvector), object storage, and AI Proxy from a one-click cloud-native template with elastic resource scaling and automatic networking.
Deployment Architecture
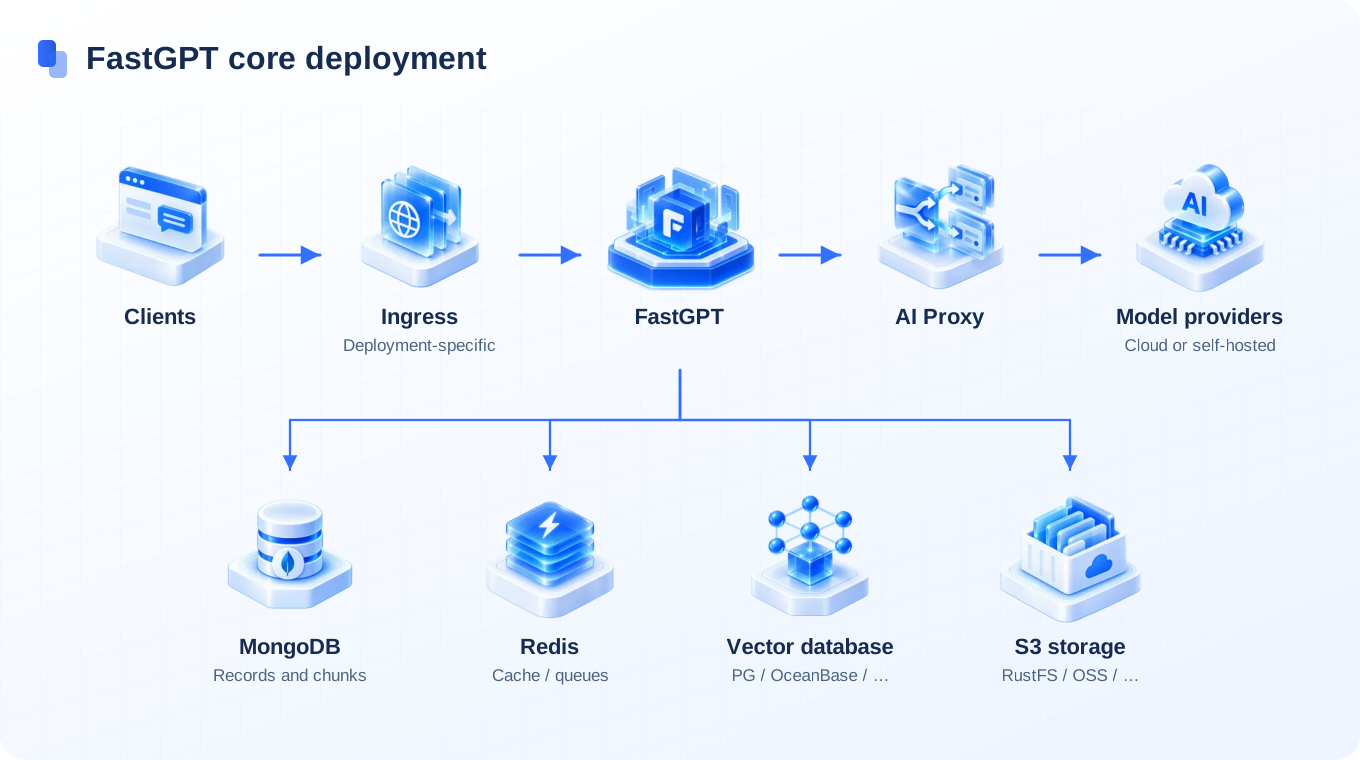

Multi-Model Support
Current FastGPT uses AI Proxy for model channels. Template components, defaults, and images can change between releases. Inspect model, database, and object-storage settings in the selected template before deployment.
See: Current model configuration
One-Click Deployment
Use a Sealos template to create the application and its dependencies. Choose a region based on user location, model-service connectivity, resource requirements, and current pricing. Screenshots below include older template interfaces; use the components and fields of your selected template.
Singapore Region
Before selecting Singapore, verify connectivity for your users and required model services, and check current pricing.

Beijing Region
Before selecting Beijing, verify connectivity for your users and required model services, and check current pricing.

1. Start Deployment
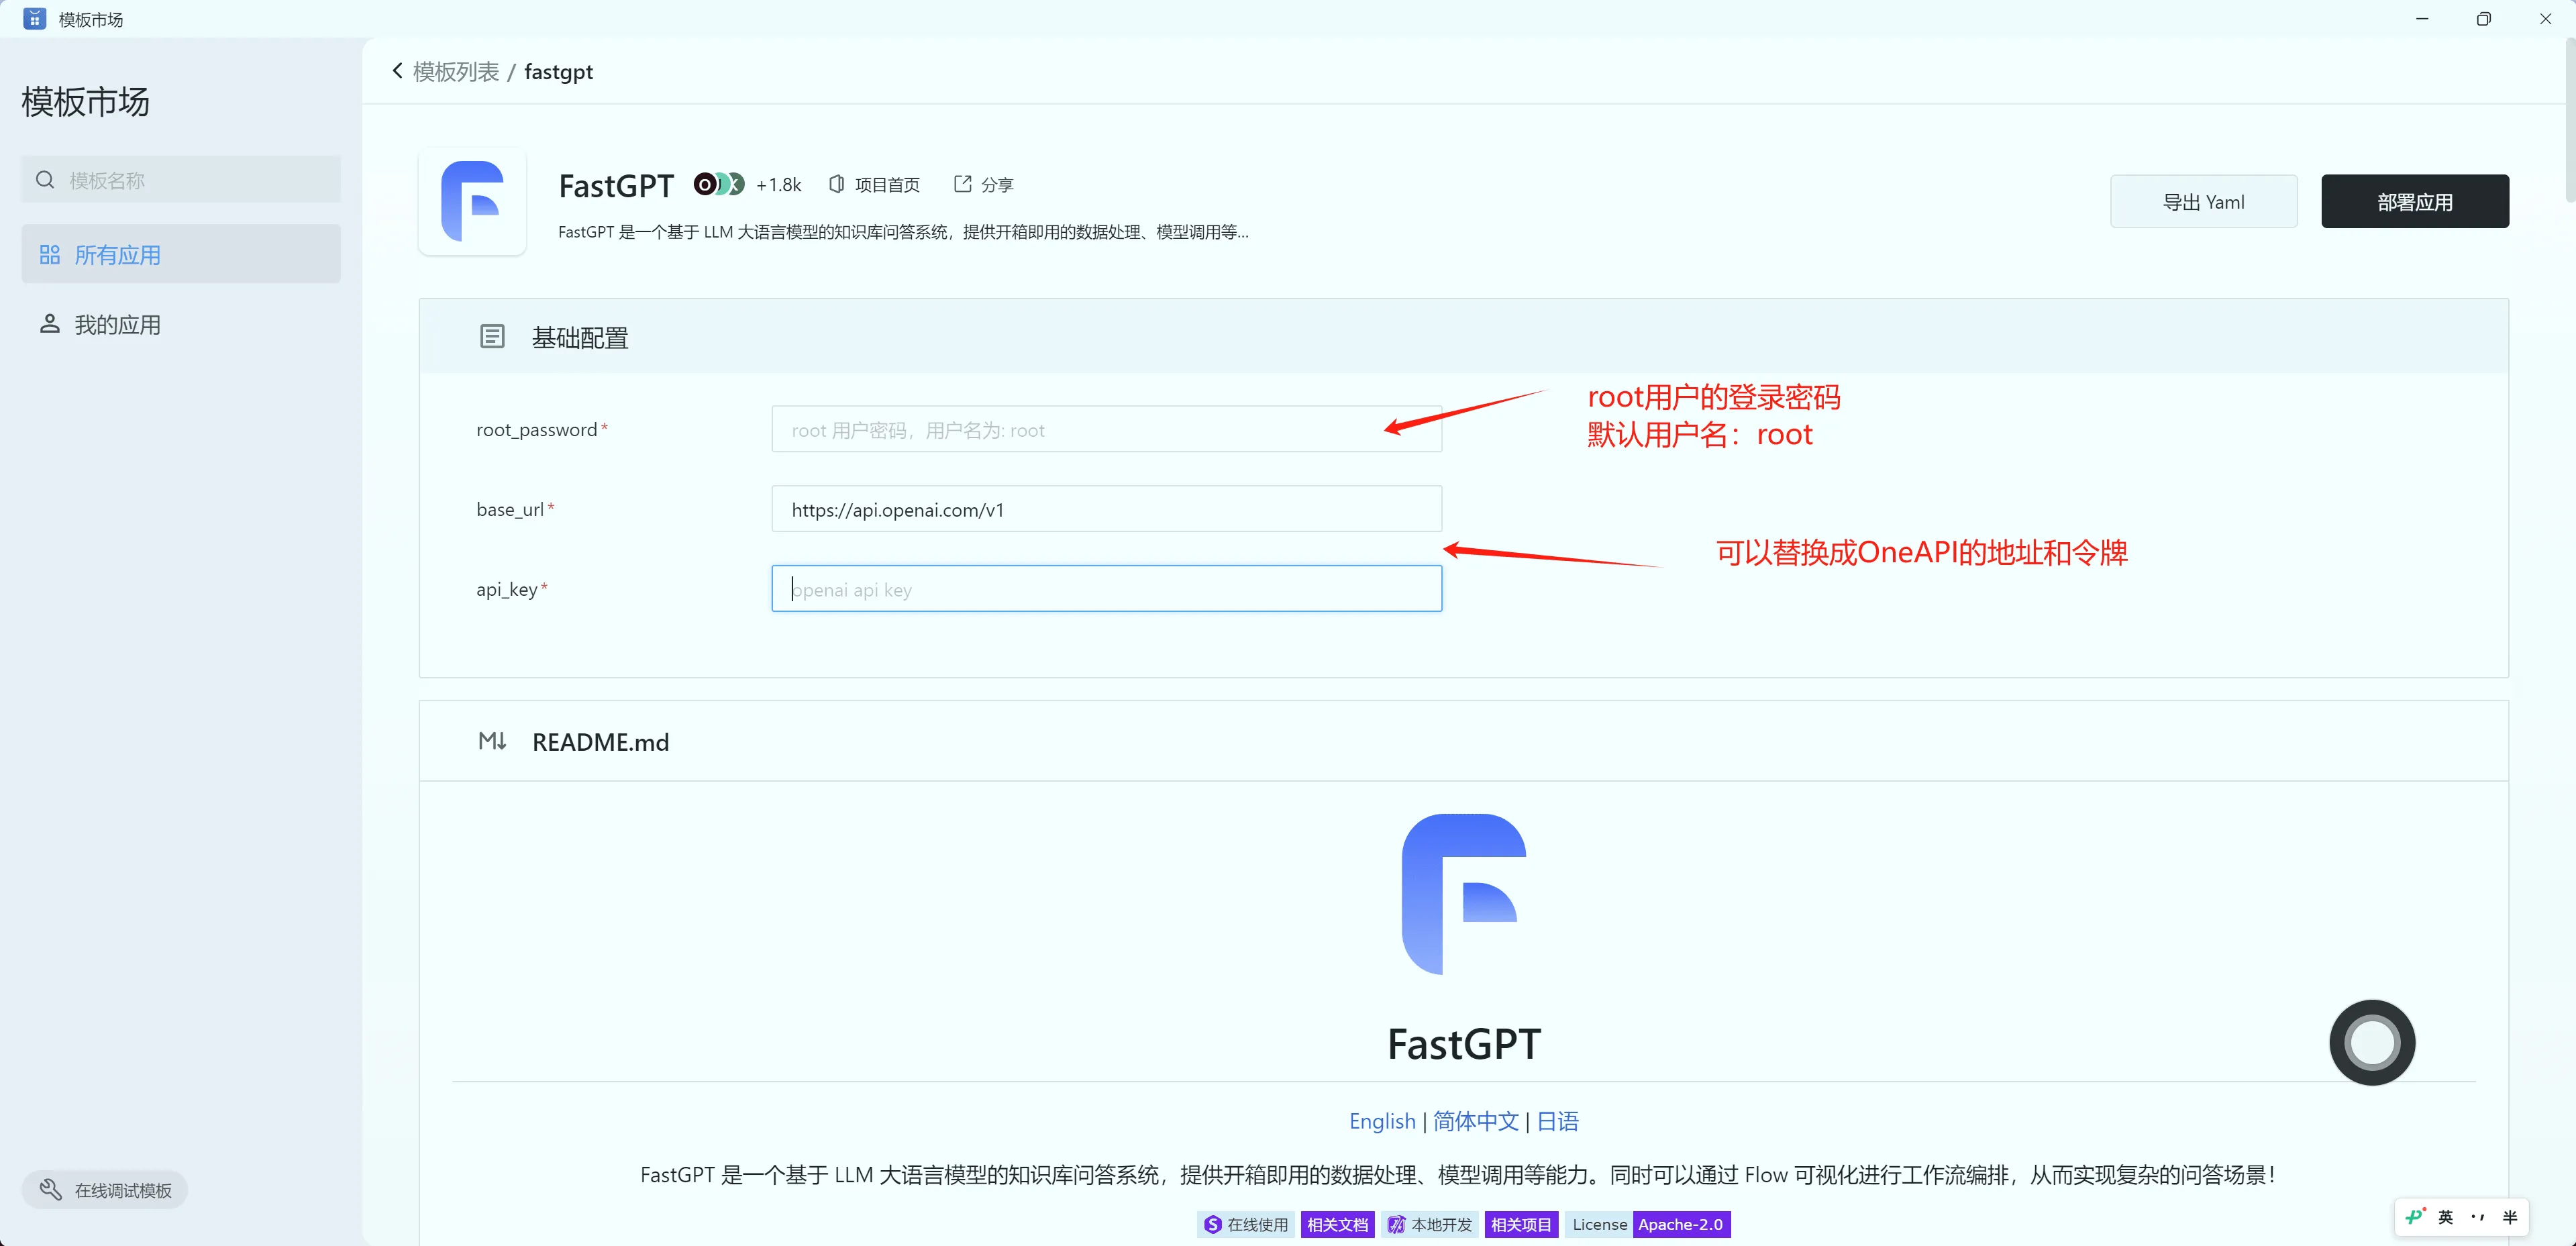
Since databases need to be deployed, wait 2–4 minutes after deployment before accessing. The default uses minimal resources, so the first access may be slow.
Inspect initial administrator credentials, databases, object storage, and AI Proxy settings. Older templates may expose root_password, base_url, and api_key fields; the selected template defines the current parameters.
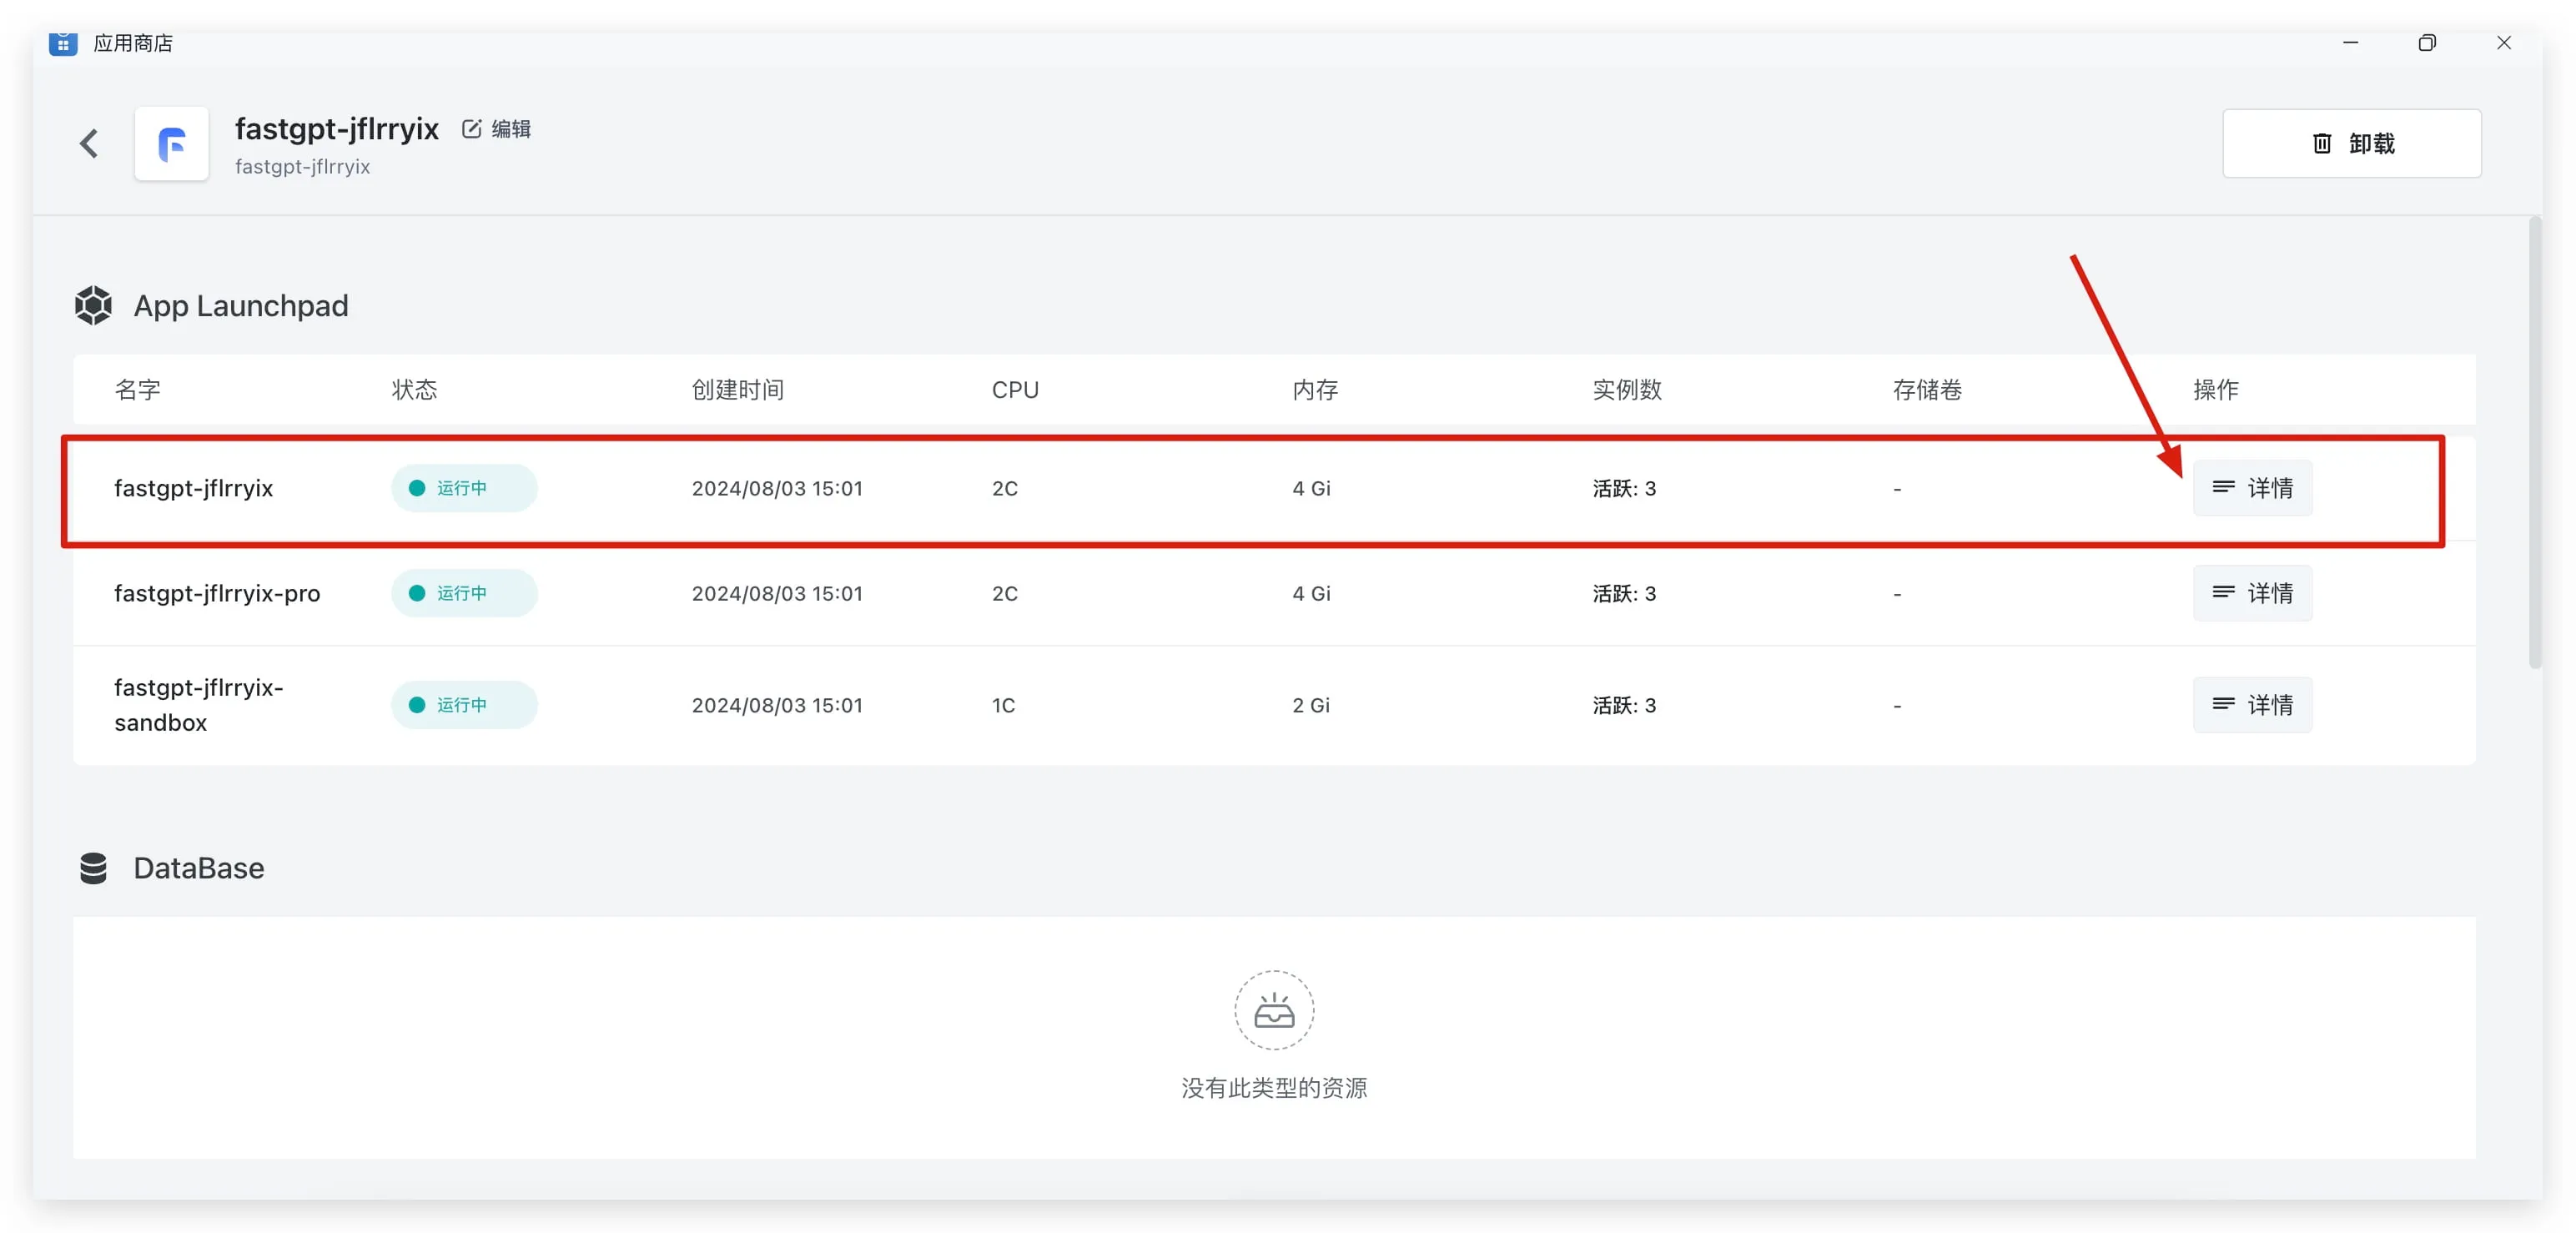
After clicking deploy, you'll be redirected to the app management page. Click the details button on the right side of the fastgpt main app (named fastgpt-xxxx), as shown below.
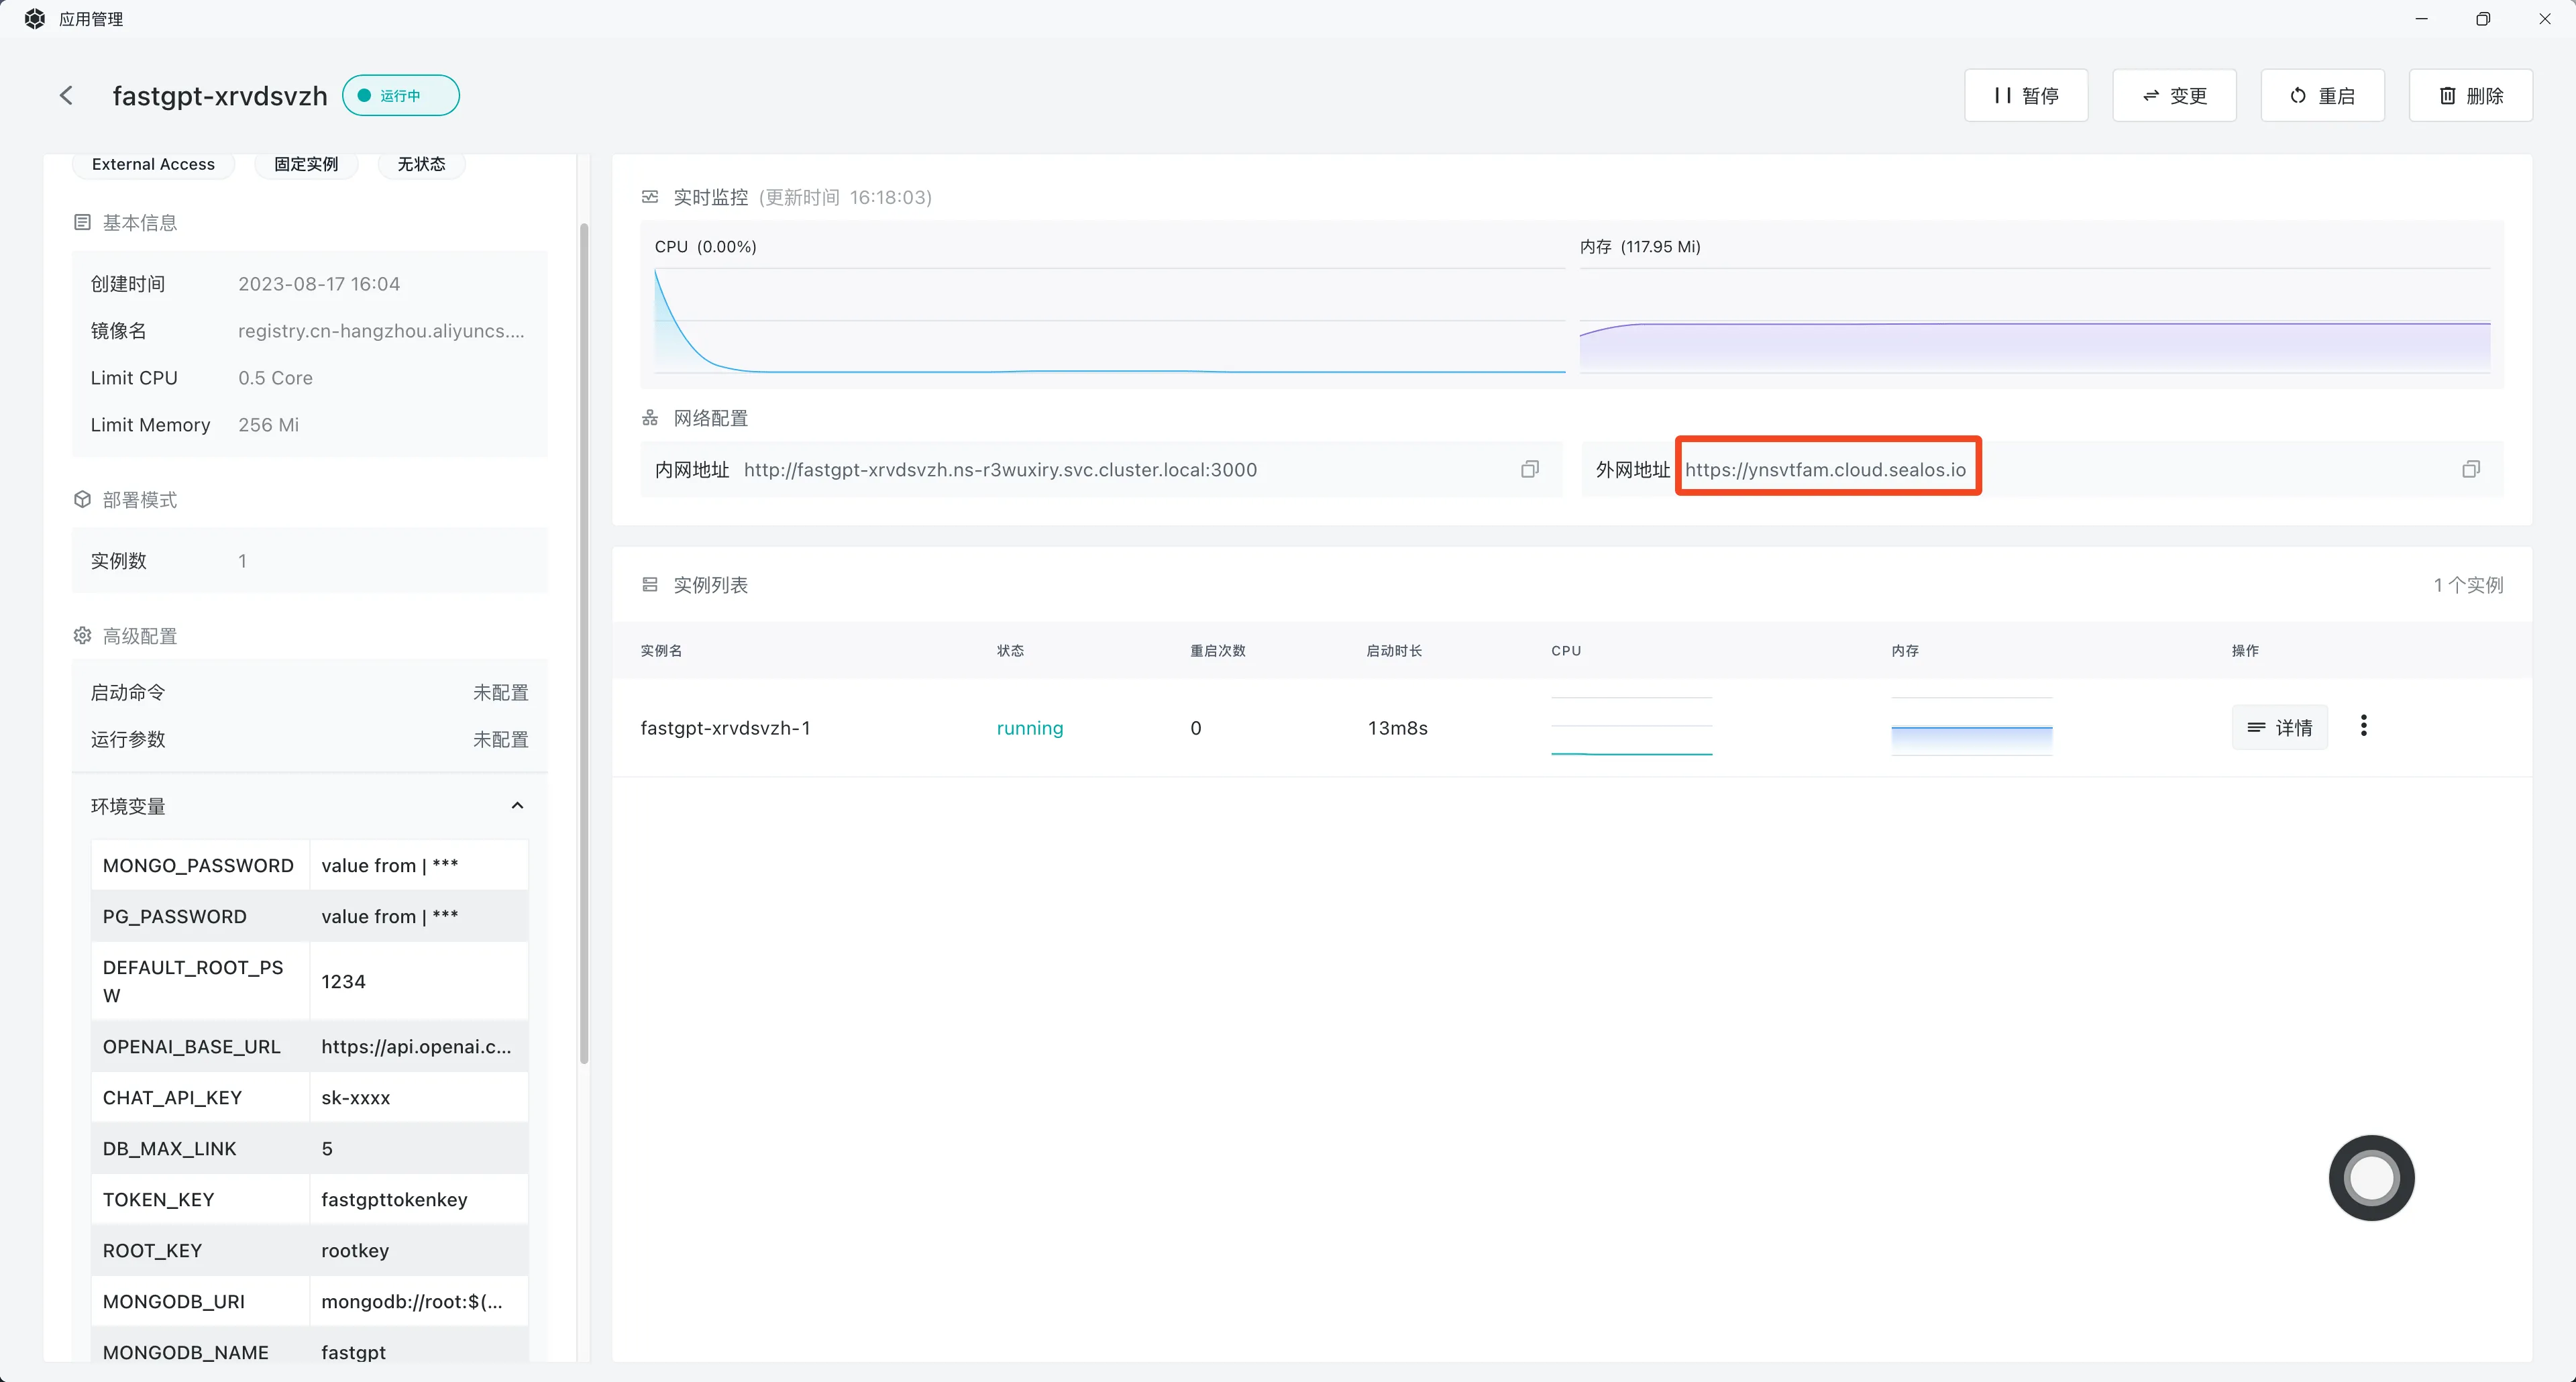
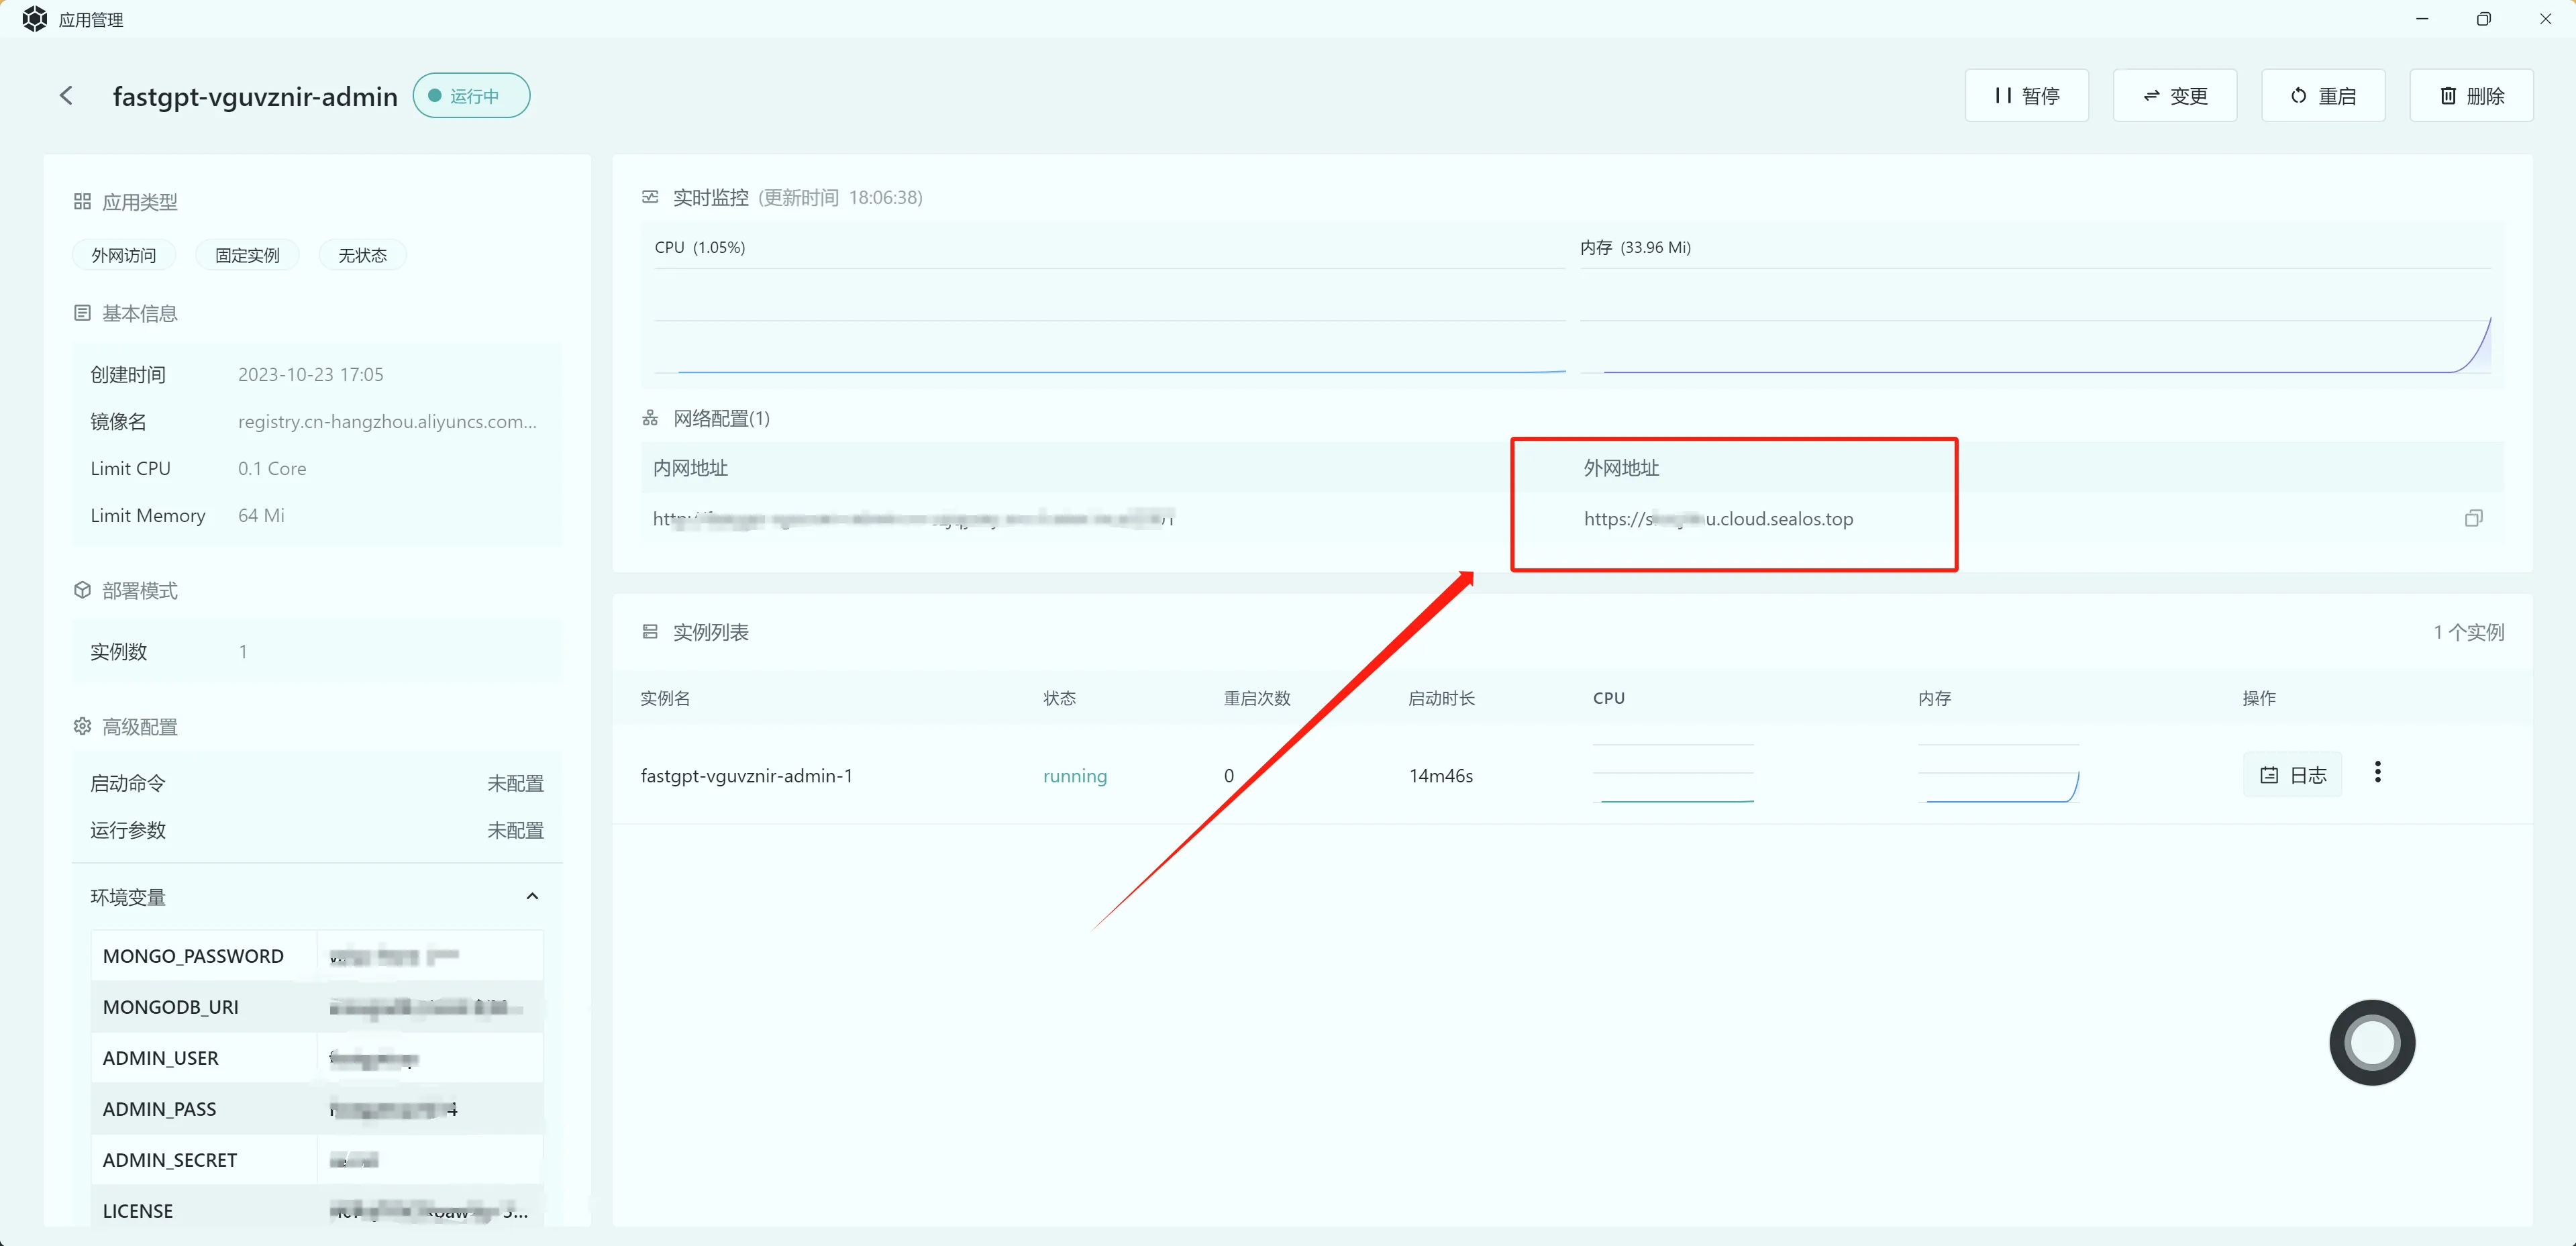
After clicking details, you'll see the FastGPT deployment management page. Click the link in the external access address to open the FastGPT service.
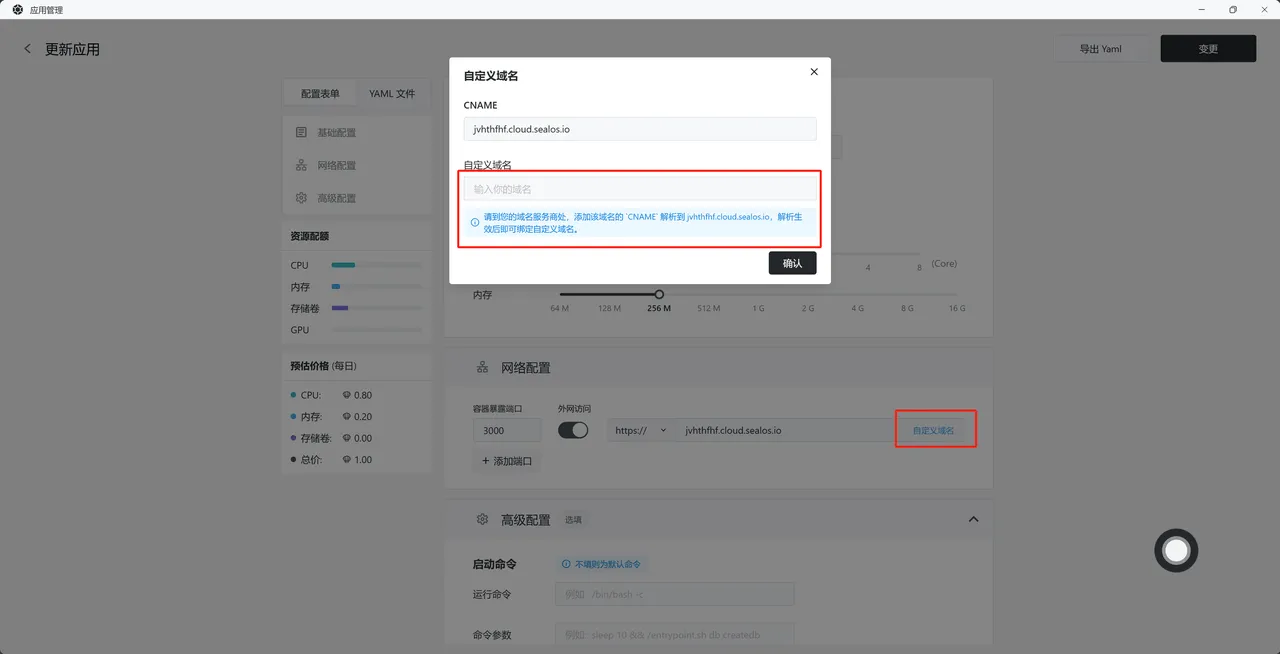
To bind a custom domain or modify deployment parameters, click Change in the top right and follow Sealos' instructions.
2. Log In
Username: root
Password: for v4.17.3 and later, the first login opens the Account activation modal and requires a new password before you continue; new instances start with the initial password 123456. For v4.17.2 and earlier, use the initial administrator password configured in the template; older templates call this root_password.
3. Configure Models
After login, configure a language model in Admin → System Resources → System Models. Knowledge retrieval also requires an embedding model. Test channel connectivity on the Model provider tab and then the selected models.
4. Verify Knowledge-Base Q&A
Complete your first knowledge-base Q&A to verify file ingestion, indexing, answers, and citations.
View model configuration tutorial
Pricing
Sealos uses pay-as-you-go billing based on allocated CPU, memory, and disk. For specific pricing, open the Cost Center in the Sealos control panel.
Using Sealos
Overview
Inspect all template services in App Launchpad and Database. Record images, persistent storage, and dependencies. Commercial deployments commonly include an additional commercial service; the template and enabled capabilities determine the actual component count.
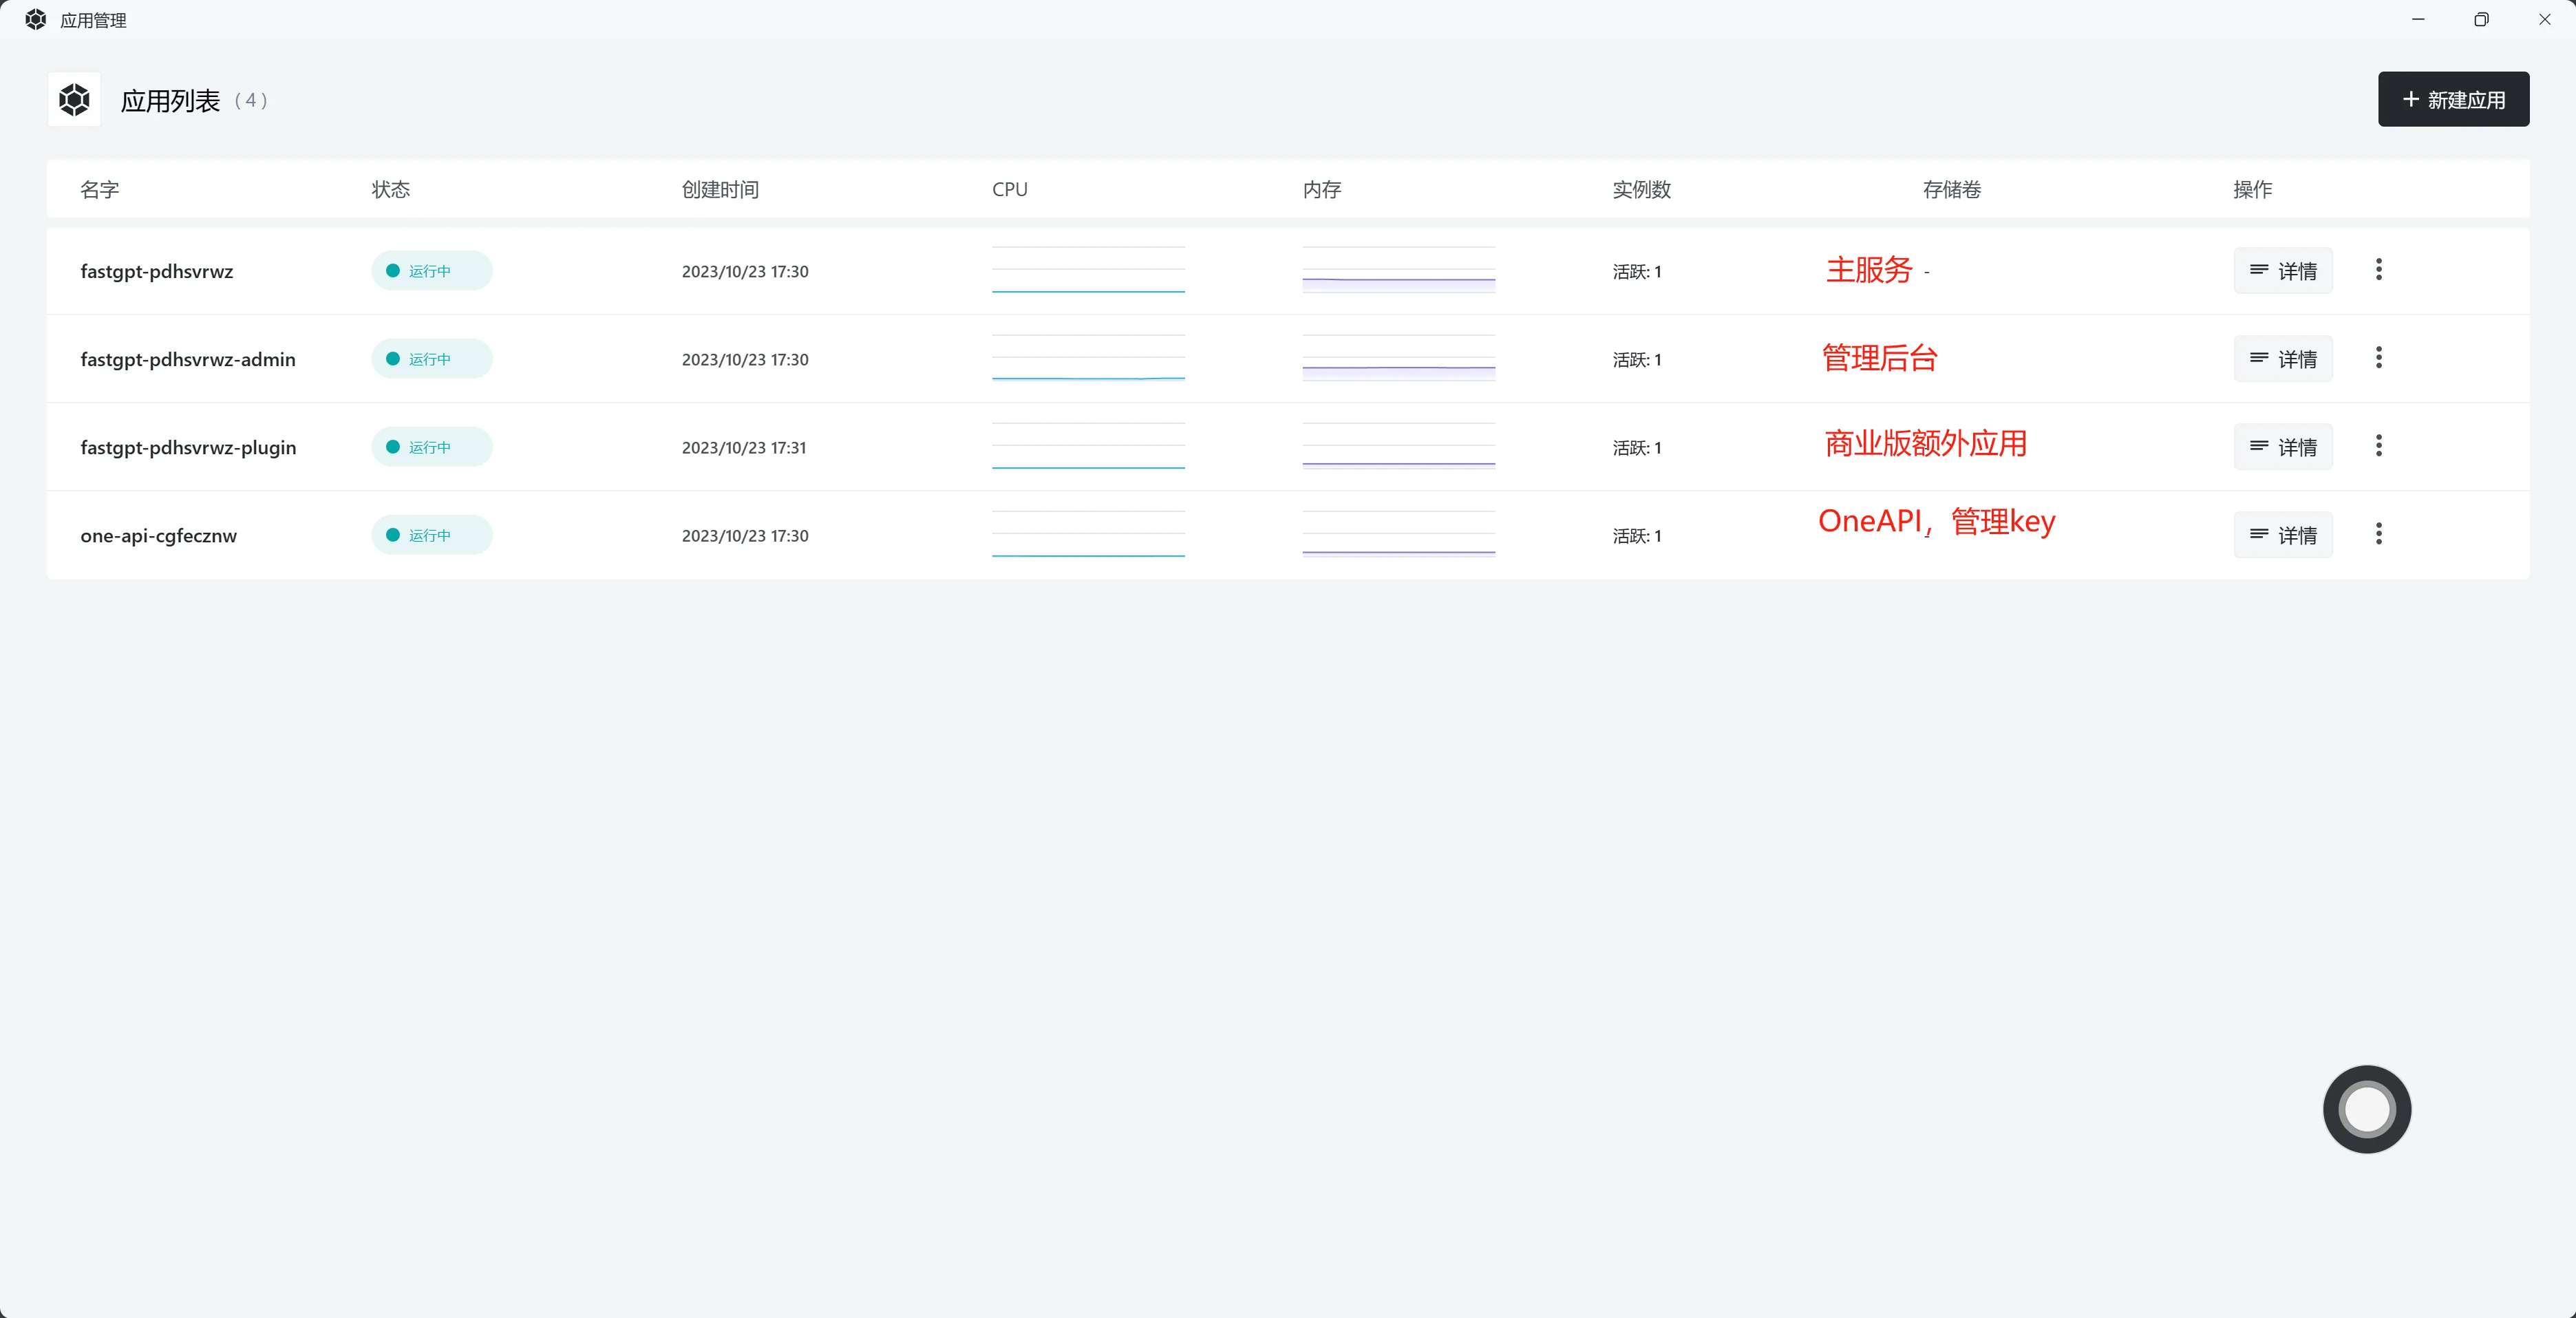
Click details on the right to view each app's information.
Modifying Config Files and Environment Variables
In Sealos, open App Launchpad to see deployed FastGPT apps, and open Database to see corresponding databases.
In App Launchpad, select FastGPT, click Change, and you'll see environment variables and config files.

Before pausing or deleting services, inspect the complete dependency and persistent-data inventory. Verify backups and restoration before handling individual services.
How to Update/Upgrade FastGPT
Before upgrading, review the Upgrade Instructions, upgrade sequentially through minor versions (for example, from v4.17.2 to v4.17.3), and check whether any system migration tasks require attention after each version.
Upgrade steps:
- Check the update documentation to confirm the target version — avoid skipping versions.
- Open Sealos app management
- Locate the main service, commercial service, and dependencies requiring a coordinated upgrade in the template inventory
- Click the 3 dots on the right side of the app, then Change. Or click details, then Change in the top right.
- Modify the image version number
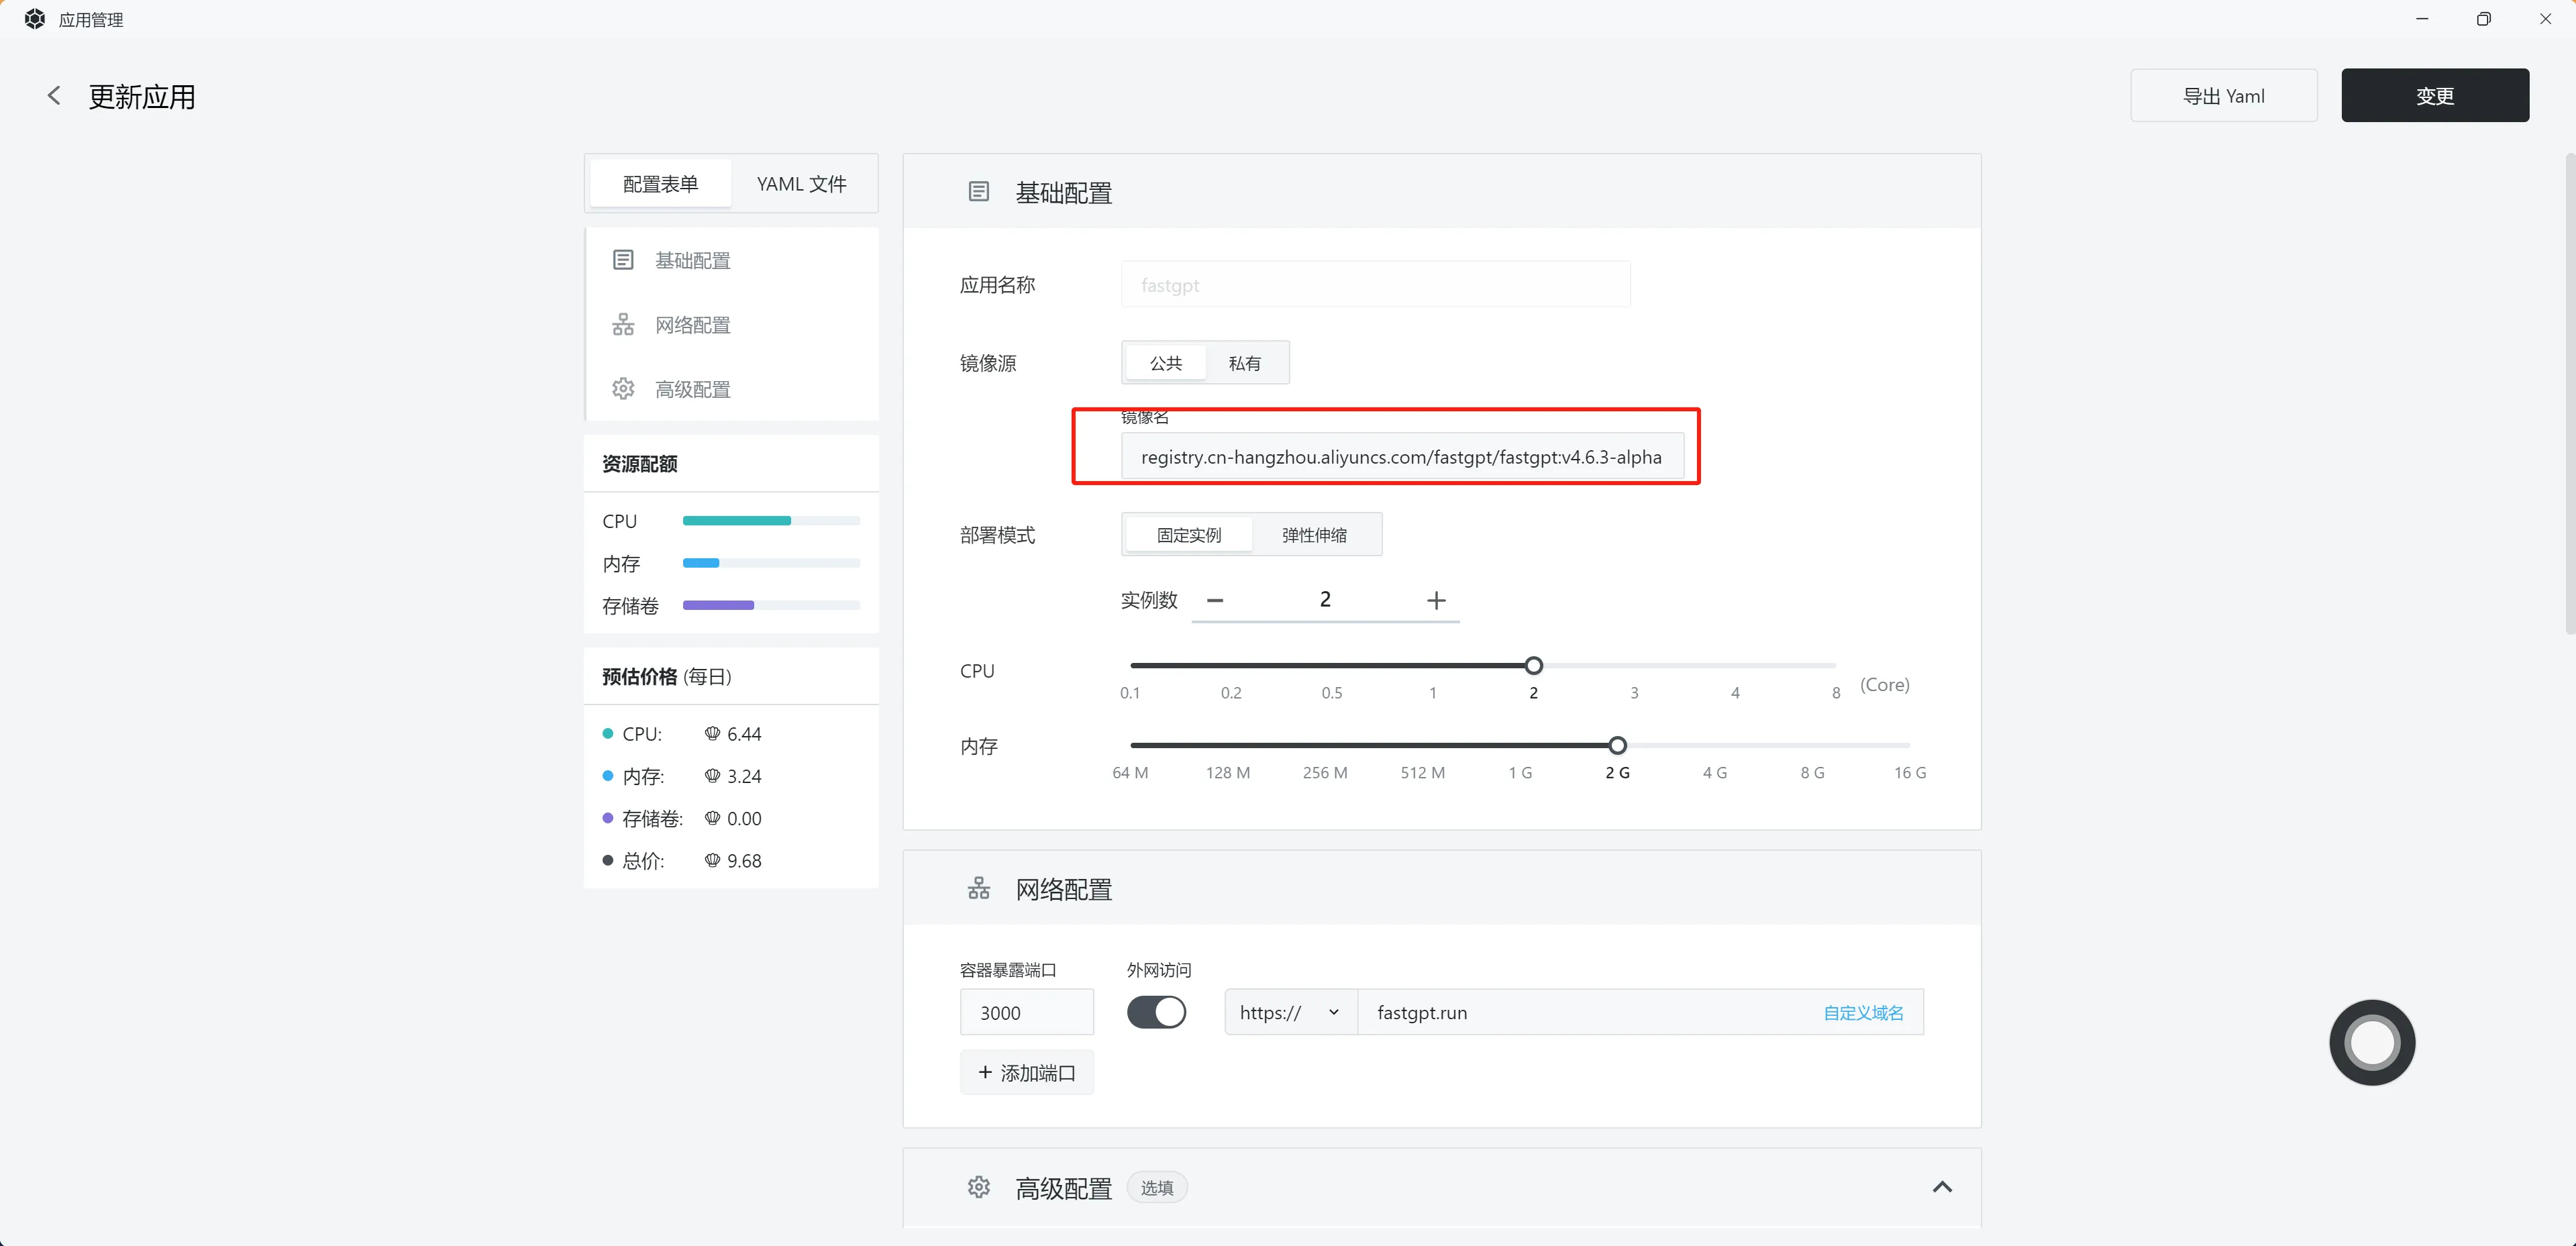
- Click Change/Restart to automatically pull the latest image and update
- Run the initialization script for the corresponding version (if applicable)
How to Get the FastGPT Access Link
Open the corresponding app and click the external access address.
Configure a Custom Domain
Click Change on the app -> Custom Domain -> enter domain -> configure domain CNAME -> confirm -> confirm change.
How to Modify Environment Variables
Open Sealos app management -> find the app -> Change -> edit environment variables -> click confirm change in the top right.
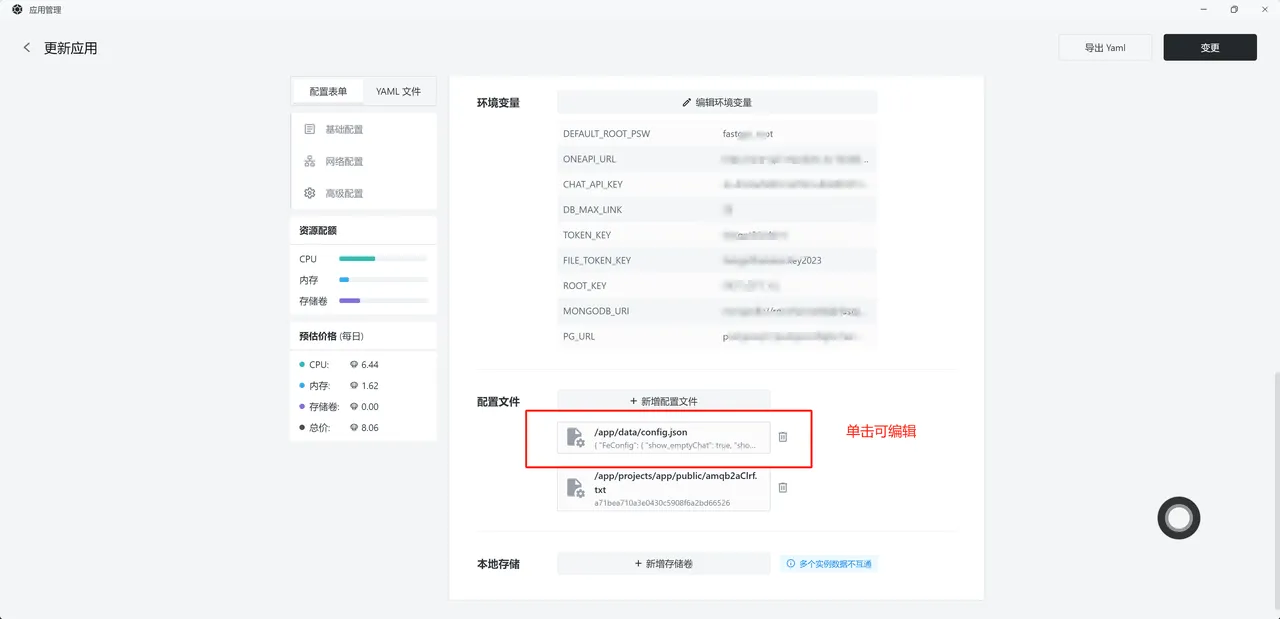
Modify Site Name and Favicon
Add these environment variables to the app:
SYSTEM_NAME=FastGPT
SYSTEM_DESCRIPTION=
SYSTEM_FAVICON=/favicon.ico
SYSTEM_FAVICON can be a URL.
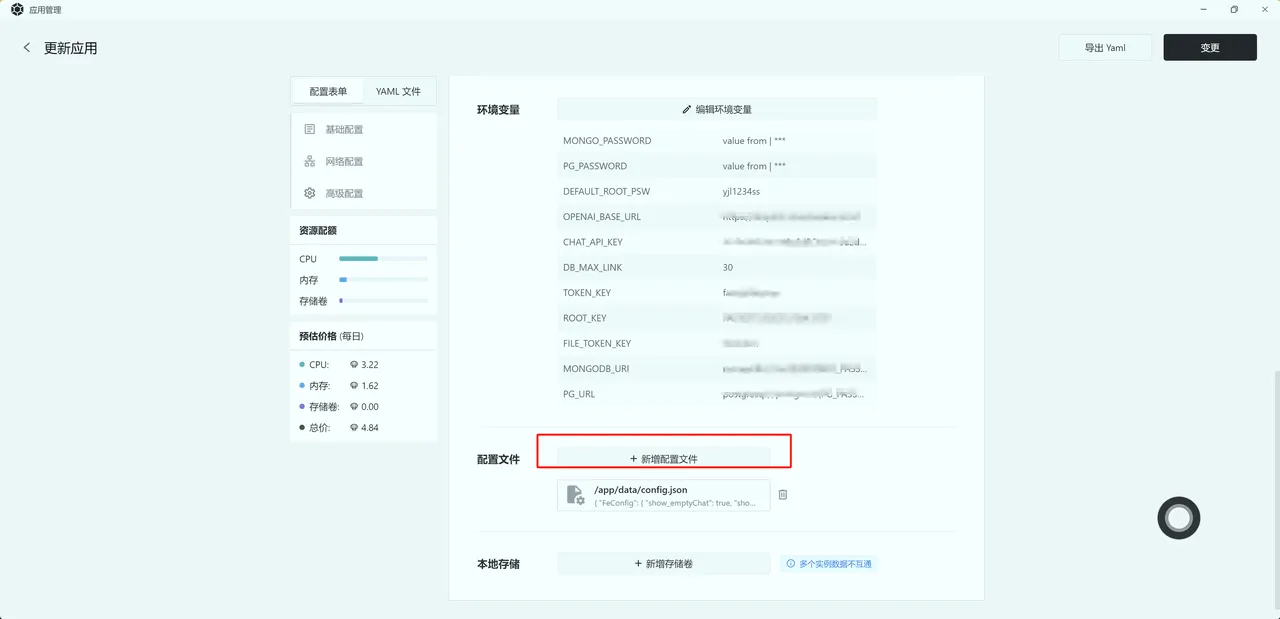
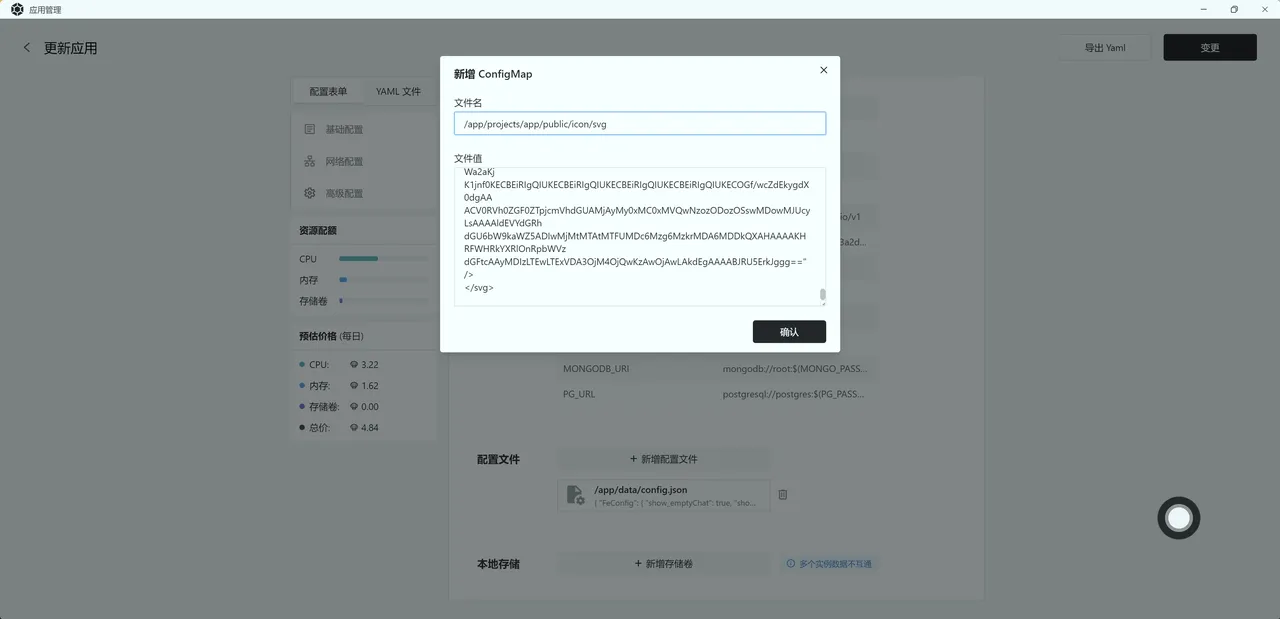
Mount a Logo
Check license conditions and the current commercial administration interface before customizing branding. The legacy SVG mount example below applies to images retaining this path.
Add a mounted file with path: /app/projects/app/public/icon/logo.svg, with the SVG content as the value.
Commercial Edition Config File
Legacy commercial images that mount config.json use the following structure (in v4.15.0 and later, configure the commercial license and branding under Admin → System Config):
{
  "license": "",
  "system": {
    "title": ""
  }
}
Using OneAPI
For legacy OneAPI integration, see current model configuration and migration
Last updated