
Deploy with Docker Compose
Deploy and configure FastGPT with PostgreSQL pgvector or Milvus using Docker Compose.
FastGPT supports single-host self-hosted deployment via Docker Compose on Linux, macOS, and Windows, provisioning the core web app, plugin runtime, AI Proxy model gateway, MongoDB, RustFS object storage, and your choice of pgvector, Milvus, Zilliz, OceanBase, SeekDB, or OpenGauss vector database.
Prerequisites
- Basic networking knowledge: ports, firewalls, etc.
- Docker and Docker Compose basics
Deployment Architecture
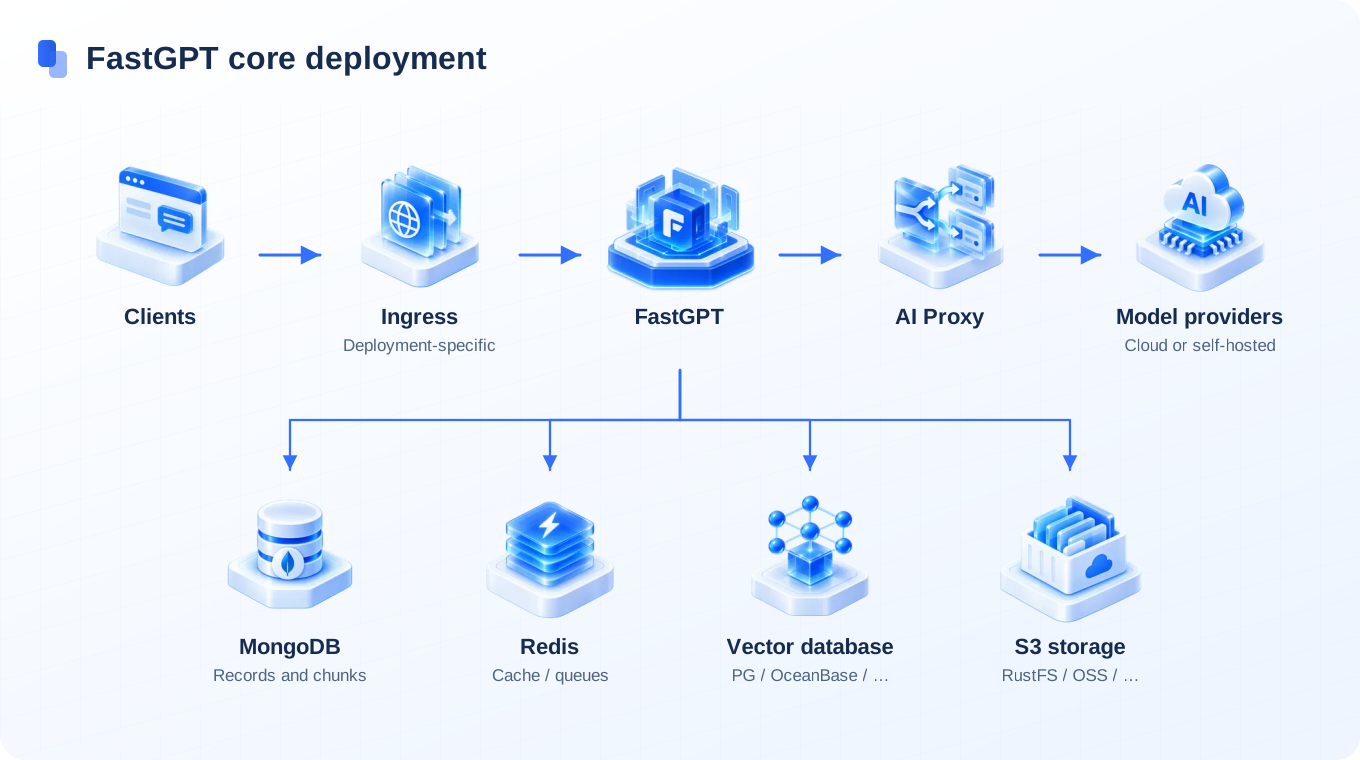

- MongoDB: Stores business metadata, Collections, and chunks; object storage holds source files and other assets.
- PostgreSQL/Milvus/OceanBase/SeekDB/OpenGauss: Stores vector data
- AI Proxy: Required for proxying model requests and managing providers in the Admin interface.
Recommended Specs
Vector Database Selection Matrix
| Vector Store | Architecture & Protocol | Hybrid Retrieval | Ops Complexity | Best-Fit Workload |
|---|---|---|---|---|
| PgVector | Single-container PostgreSQL extension (pg) | Vector search + MongoDB full-text | Low (simple backups) | Default choice for PoCs and small-to-medium production up to ~5M vectors |
| Milvus | Dedicated vector engine (requires ≥ 2.5.16) | Vector search + native Milvus BM25 | Medium–High | High-concurrency or 10M+ vector workloads needing independent scaling |
| Zilliz Cloud | Fully managed cloud Milvus service | Vector search + managed full-text | Minimal (managed SaaS) | Teams offloading vector index memory and cluster maintenance to the cloud |
| OceanBase / SeekDB | Distributed DB / MySQL-compatible protocol | Vector search + hybrid recall | Medium | Enterprises standardized on OceanBase or MySQL operational tooling |
| OpenGauss | Enterprise relational database with vector indexing | Vector search + hybrid recall | Medium | Regulated on-premises environments standardized on OpenGauss |
PgVector Version
The following are historical sizing estimates. Actual requirements depend on vector dimensions, index settings, document size, concurrency, and other services on the host. Benchmark representative data and reserve capacity for backups and growth.
| Environment | Minimum (Single Node) | Recommended |
|---|---|---|
| Testing (reduce compute processes) | 2c4g | 2c8g |
| 1M vector groups | 4c8g 50GB | 4c16g 50GB |
| 5M vector groups | 8c32g 200GB | 16c64g 200GB |
Milvus Version
Use Milvus when your deployment needs a separately managed vector-search service. Validate capacity and performance with a representative benchmark.
Milvus must be version 2.5.16 or later. FastGPT uses BM25 full-text search in modeldata_v2 with Milvus; startup rejects older Milvus versions.
View Milvus official recommended specs
| Environment | Minimum (Single Node) | Recommended |
|---|---|---|
| Testing | 2c8g | 4c16g |
| 1M vector groups | Not tested | |
| 5M vector groups |
Zilliz Cloud Version
Zilliz Cloud provides a managed vector database. Capacity, connectivity, SLA, and pricing depend on the selected plan.
The vector service runs in the cloud. FastGPT, MongoDB, object storage, and other local components still need resources.
SeekDB Version
SeekDB uses the MySQL protocol and has a FastGPT vector-store adapter. Treat the table as sizing estimates; verify the database version, model dimensions, and actual workload.
| Environment | Minimum (Single Node) | Recommended |
|---|---|---|
| Testing (reduce compute processes) | 2c4g | 2c8g |
| 1M vector groups | 4c8g 50GB | 4c16g 50GB |
| 5M vector groups | 8c32g 200GB | 16c64g 200GB |
The FastGPT SeekDB adapter provides the following capabilities, subject to the selected database version and model configuration:
- Vector indexes configured for the model dimensions
- Built-in HNSW index algorithm
- Batch insertion and query optimization
- Automatic retry and connection pool management
Preparation
Prepare Docker Environment
# Install Docker (includes the Docker Compose V2 plugin)
curl -fsSL https://get.docker.com | bash -s docker --mirror Aliyun
systemctl enable --now docker
# Verify installation
docker -v
docker compose version
If installation fails, refer to the official Docker installation guide.
We recommend Orbstack. Install via Homebrew:
brew install orbstackOr download the installer directly.
We recommend storing source code and data in the WSL 2 Linux filesystem when binding to Linux containers to maintain optimal I/O throughput and correct file permissions.
You can install Docker Desktop with WSL 2 backend on Windows.
Or install the command-line version of Docker directly in WSL 2.
Start Deployment
1. Get Configuration Files
Method 1: Deploy with an AI Agent
Copy the following content to your Coding Agent:
Refer to https://doc.fastgpt.io/deploy/SKILL.md and deploy FastGPT with Docker for me.Method 2: Interactive Script Deployment
Run in Linux/MacOS/Windows WSL. The script prompts for the deployment version, image registry, vector database, and whether to generate credentials automatically, then asks for the FastGPT access URL, the Sandbox WebSocket / preview URLs, and host ports before the final confirmation.
FASTGPT_DEPLOY_BASE_URL=https://doc.fastgpt.io bash <(curl -fsSL https://doc.fastgpt.io/deploy/install.sh)If the documentation site uses a custom domain, an internal domain, or a local address, set FASTGPT_DEPLOY_BASE_URL to choose the download source. You can provide either the site root or a URL ending in /deploy; the script downloads docker-compose.yml from that source, as in the command above. When an older compose file still mounts config.json, the script downloads that file too.
Set FASTGPT_NON_INTERACTIVE=true to run in non-interactive mode. The script skips the prompts and reads options from variables such as FASTGPT_DEPLOY_VERSION, FASTGPT_REGION, FASTGPT_VECTOR, and FASTGPT_AUTO_GENERATE_CREDENTIALS; unset options default to main, cn, pg, and automatic credential generation. If the script cannot detect the image version, set FASTGPT_IMAGE_TAG or FASTGPT_ROOT_ACTIVATION.
Non-interactive mode also requires FASTGPT_FE_DOMAIN, the full URL users use to access FastGPT, such as https://fastgpt.example.com.
Versions with Agent/Skill Sandbox also require FASTGPT_SANDBOX_PROXY_URL, the Sandbox WebSocket URL, such as wss://sandbox-proxy.example.com;
Versions 4.16 and later also require FASTGPT_SANDBOX_PREVIEW_PROXY_URL for the HTTP preview URL.
Access URLs and host ports are configured independently. For direct access, set FASTGPT_PORT for the FastGPT host port (default 3000) and FASTGPT_SANDBOX_PROXY_PORT for the Sandbox Proxy host port (default 3006); the container ports remain 3000 and 1006. With a reverse proxy, public ports in FASTGPT_FE_DOMAIN, FASTGPT_SANDBOX_PROXY_URL, and the preview URL (for example, 443) are not treated as host ports, so the script keeps the default Compose mappings.
The script automatically performs the following actions:
- Downloads
docker-compose.yml. - When deploying v4.14, or when the local compose file contains
STORAGE_EXTERNAL_ENDPOINT, prompts for the externally accessible S3 address and writes it into the config files. - Generates random service tokens, app keys, and component passwords, then writes them into
docker-compose.yml. For v4.17.2 and earlier, it also generates a randomrootlogin password. - Detects the host Docker socket path and updates the mount path in
docker-compose.ymlwhen needed.
After the script finishes, the terminal prints the root login details: for v4.17.3 and later, the initial password is fixed at 123456 and you set a new password through first-login account activation; for earlier versions, it prints the randomly generated password. Keep the generated docker-compose.yml safe. For future upgrades, start from this file so you do not lose the generated passwords and keys.
To use an existing local docker-compose.yml file, for example when testing a version that has not been published to the docs site yet, choose Local docker-compose.yml in the deployment version step and enter the local file path. You can also pass the path with an environment variable:
FASTGPT_LOCAL_COMPOSE_PATH=/path/to/docker-compose.yml bash <(curl -fsSL https://doc.fastgpt.io/deploy/install.sh)Method 3: Manual Download
If you need to pin deployment to a specific docker-compose.yml file, we recommend downloading both docker-compose.yml and install.sh, then using the script's local compose mode to generate the final config. This keeps the script's random credential generation, S3 address updates, and Docker socket detection.
- Download the required
docker-compose.ymlfile to the server, for example:
curl -fsSL https://doc.fastgpt.io/deploy/docker/main/global/docker-compose.pg.yml -o docker-compose.source.ymlClick to view docker-compose config file download links for different databases
- Pgvector
- China mirror (Alibaba Cloud): docker-compose.pg.yml
- Global mirror (dockerhub, ghcr): docker-compose.pg.yml
- Oceanbase
- China mirror (Alibaba Cloud): docker-compose.oceanbase.yml
- Global mirror (dockerhub, ghcr): docker-compose.oceanbase.yml
- Milvus
- China mirror (Alibaba Cloud): docker-compose.milvus.yml
- Global mirror (dockerhub, ghcr): docker-compose.milvus.yml
- Zilliz
- China mirror (Alibaba Cloud): docker-compose.zilliz.yml
- Global mirror (dockerhub, ghcr): docker-compose.zilliz.yml
- SeekDB
- China mirror (Alibaba Cloud): docker-compose.seekdb.yml
- Global mirror (dockerhub, ghcr): docker-compose.seekdb.yml
- OpenGauss
- China mirror (Alibaba Cloud): docker-compose.opengauss.yml
- Global mirror (dockerhub, ghcr): docker-compose.opengauss.yml
- Download
install.shto the server:
curl -fsSL https://doc.fastgpt.io/deploy/install.sh -o install.sh- Run
install.shwith the local compose file to generate the final deployment config:
FASTGPT_LOCAL_COMPOSE_PATH=./docker-compose.source.yml bash install.shThe script copies this compose file to the final docker-compose.yml, then generates credentials and writes the S3 address when needed. After generation, log in with the root login details printed in the terminal.
For a fully offline environment, prepare docker-compose.yml and install.sh in advance. If the script cannot run, manually update service tokens, database passwords, and S3 addresses (v4.17.3+ initializes with 123456 and requires changing the password in the first-login activation modal; v4.17.2 and earlier use DEFAULT_ROOT_PSW).
Deploy with a Custom Image Registry
If you use an internal Harbor, private registry, or image mirror, download docker-compose.yml first, replace all image: values with your own registry addresses, and then use local compose mode:
FASTGPT_LOCAL_COMPOSE_PATH=./docker-compose.yml bash install.shIf Agent/Skill Sandbox is enabled, also replace the sandbox-related images in the Compose file and update AGENT_SANDBOX_SEALOS_IMAGE or AGENT_SANDBOX_OPENSANDBOX_IMAGE so the sandbox provider can pull the matching images. See OpenSandbox Configuration for details.
2. Modify Environment Variables
You must set FE_DOMAIN in fastgpt-app to the complete external URL accessible to client browsers, such as https://fastgpt.example.com. It includes a scheme, host, and optional port.
When Agent/Skill Sandbox is enabled, also configure:
AGENT_SANDBOX_PROXY_URL: the browser-accessible Sandbox Proxy WebSocket URL usingws://orwss://, such aswss://sandbox-proxy.example.com, which must be forwarded to the Sandbox Proxy host port (default3006).- Version 4.16 and later additionally require
AGENT_SANDBOX_PREVIEW_PROXY_URL: the browser-accessible HTTP(S) URL for sandbox file previews, such ashttps://sandbox-proxy.example.com, forwarded to the same host port.
The interactive install script prompts for these addresses before the final confirmation.
For Zilliz version, you also need credentials — see Obtain Zilliz Cloud Credentials. Other versions can skip to the next step.
3. Open External Ports / Configure Domain
The following services must be reachable. For direct access, open the host ports printed by the script; with a reverse proxy, the proxy owns the public ports:
- Port 3000 by default (FastGPT main service; change the host port with
FASTGPT_PORT) - Port 9000 (S3 object storage service; in default
short-proxymode FastGPT proxies private files, whileshort-redirectmode or direct browser access to public bucket assets such as plugin logos requires configuringSTORAGE_EXTERNAL_ENDPOINTin Compose and opening port 9000) - Port 3006 by default (FastGPT Agent Sandbox Proxy service; change the host port with
FASTGPT_SANDBOX_PROXY_PORT)
4. Start Containers
Run in the same directory as docker-compose.yml. Ensure docker-compose version is 2.17+, or automated commands may fail.
# Pre-pull all service and sandbox runtime images
docker compose --profile prepull pull

# Start containers
docker compose up -d
5. Access FastGPT
Access FastGPT via the port/domain opened in step 3. The login username is root:
- Version v4.17.3 and later: The initial password is fixed at
123456. An activation modal requires setting a new password upon first login (any residualDEFAULT_ROOT_PSWvariable inv4.17.3+Compose templates is ignored). If forgotten, reset the password using the built-in CLI script. See Modify and Reset Root Password. - Legacy versions (v4.17.2 and earlier): The password is set via
DEFAULT_ROOT_PSWindocker-compose.yml. When deploying with the interactive script, a random password is generated and displayed upon completion. Each container restart updates the password to this value.
6. Configure Models
- After first login, if models are not yet configured, the system prompts that related models or embedding models are not configured and guides you to the model configuration page. At least a language model and an embedding model are required.
- If the redirect doesn't happen, go to Admin → System Resources → System Models to configure models. View tutorial
- Known issue: after first entering the system, the browser tab may become unresponsive. Close the tab and reopen it.
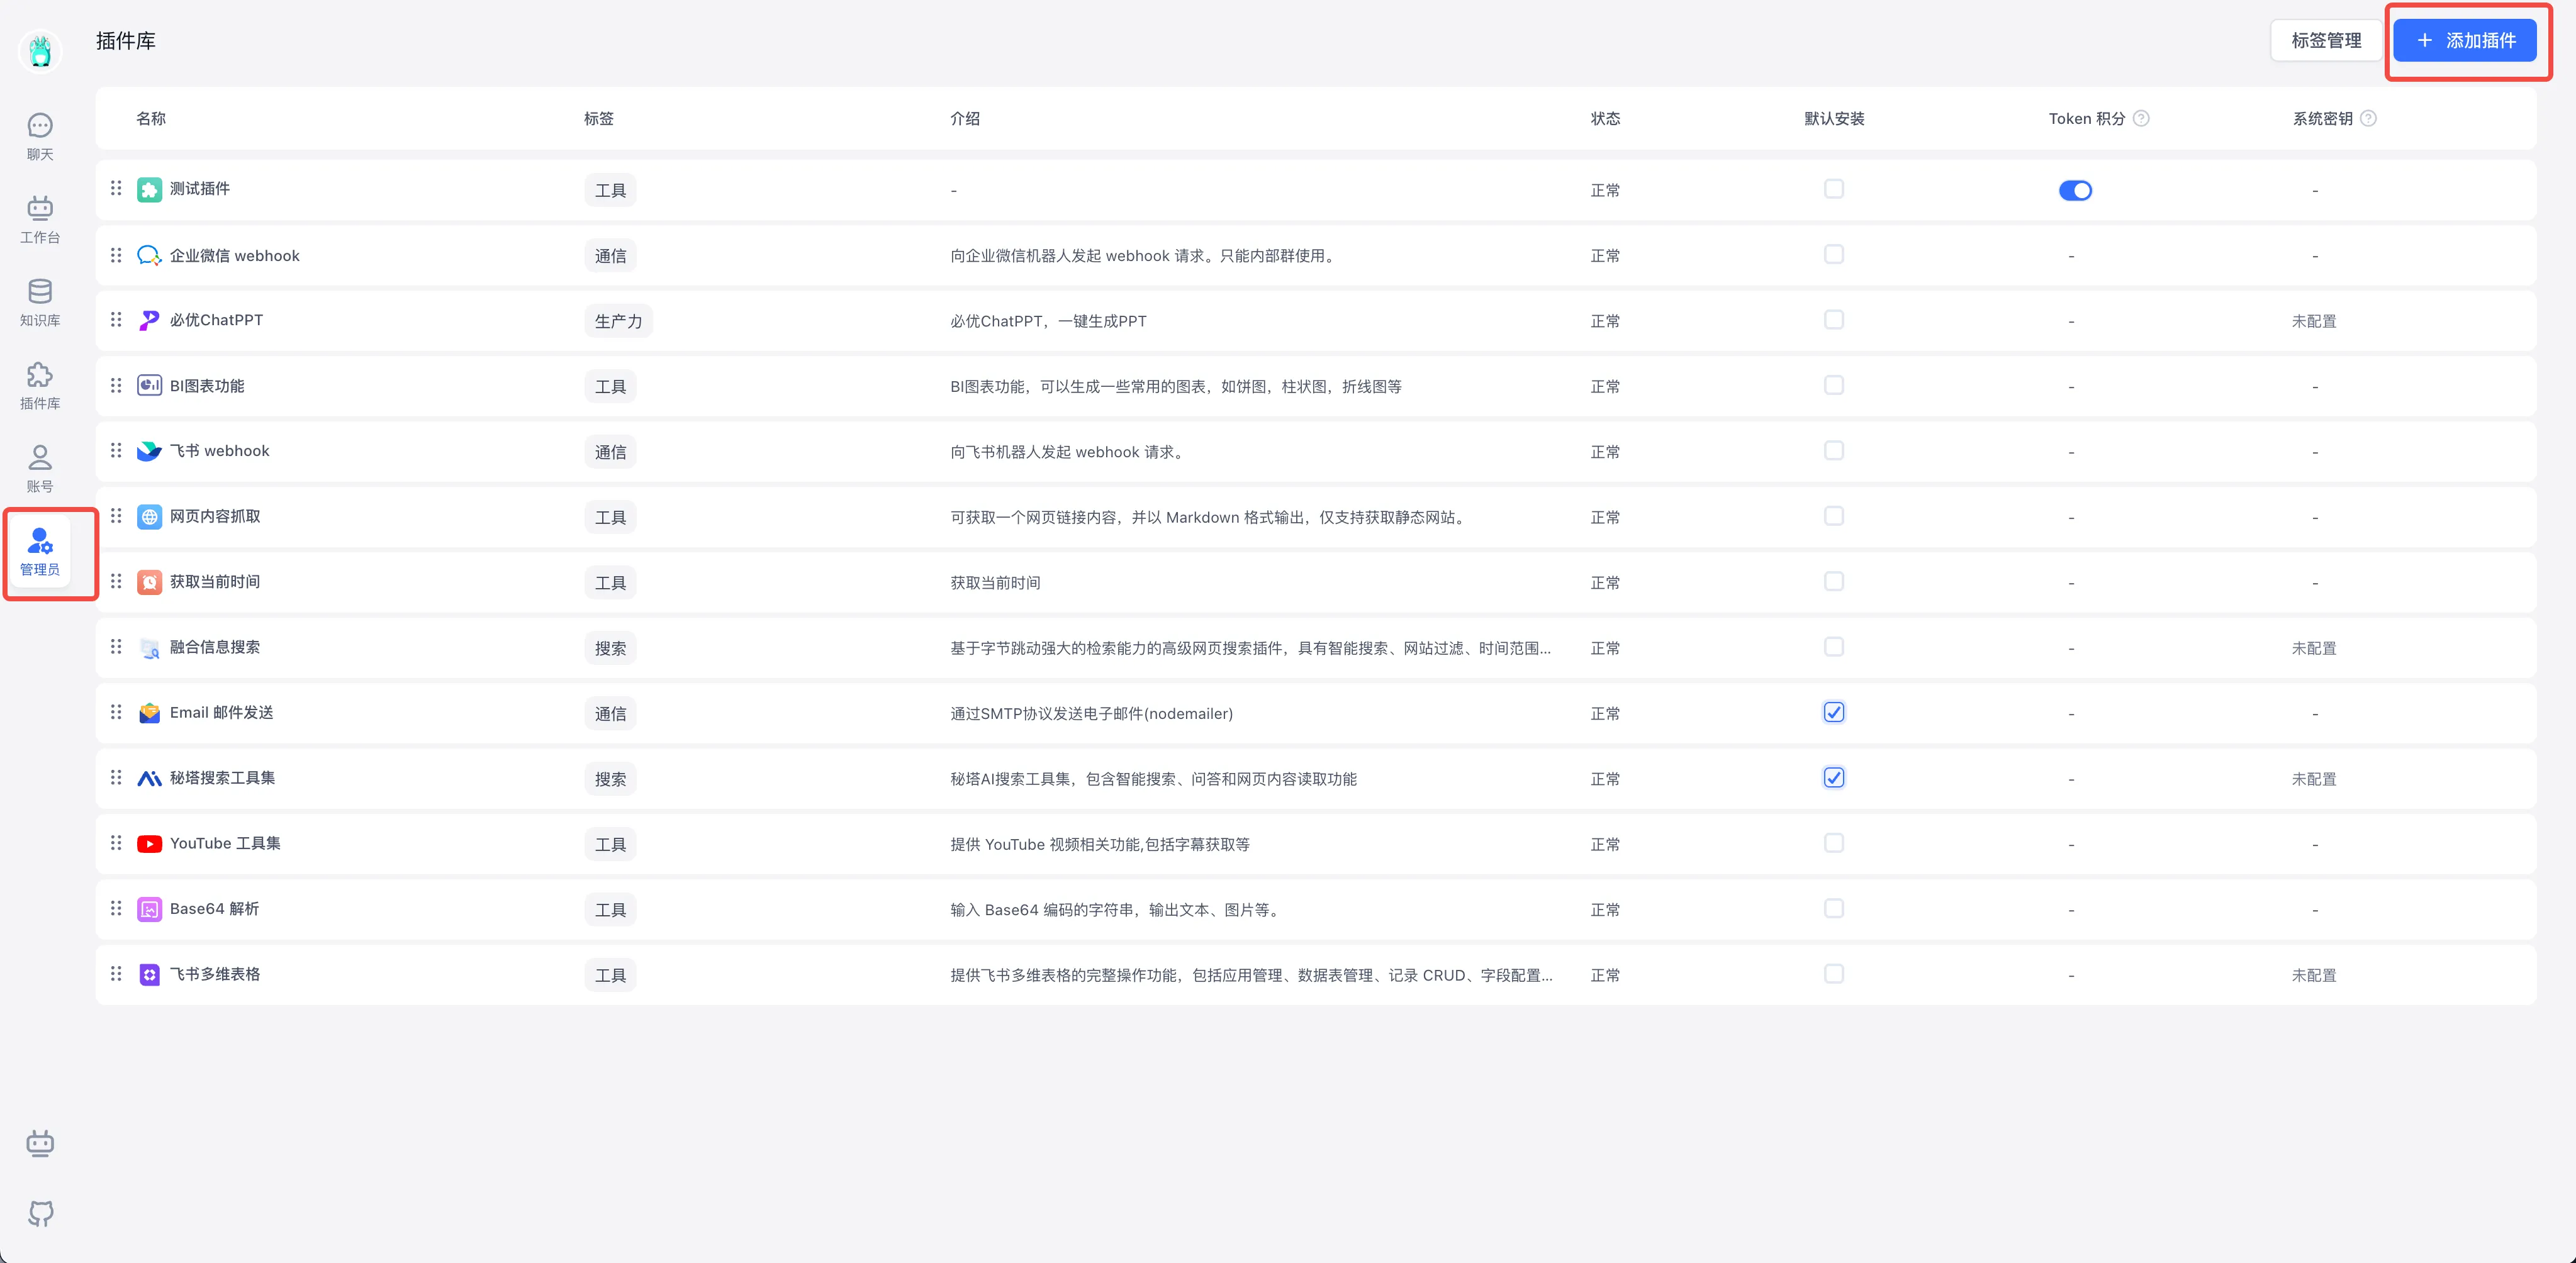
7. Install System Plugins as Needed
Starting from V4.14.0, the fastgpt-plugin image provides the runtime environment, and administrators can install system plugins on demand under Admin → (Commercial Edition: System Resources →) System Tools:
- Install via the plugin marketplace — by default it fetches from the public FastGPT Marketplace.
- If your FastGPT can't access the marketplace, visit FastGPT Plugin Marketplace, download .pkg files, and import them via file upload.
- You can also sort tools, set default installations, and manage tags.
8. Obtain Zilliz Cloud Credentials (For Zilliz Compose Templates)
Open Zilliz Cloud, create an instance, and get the credentials.
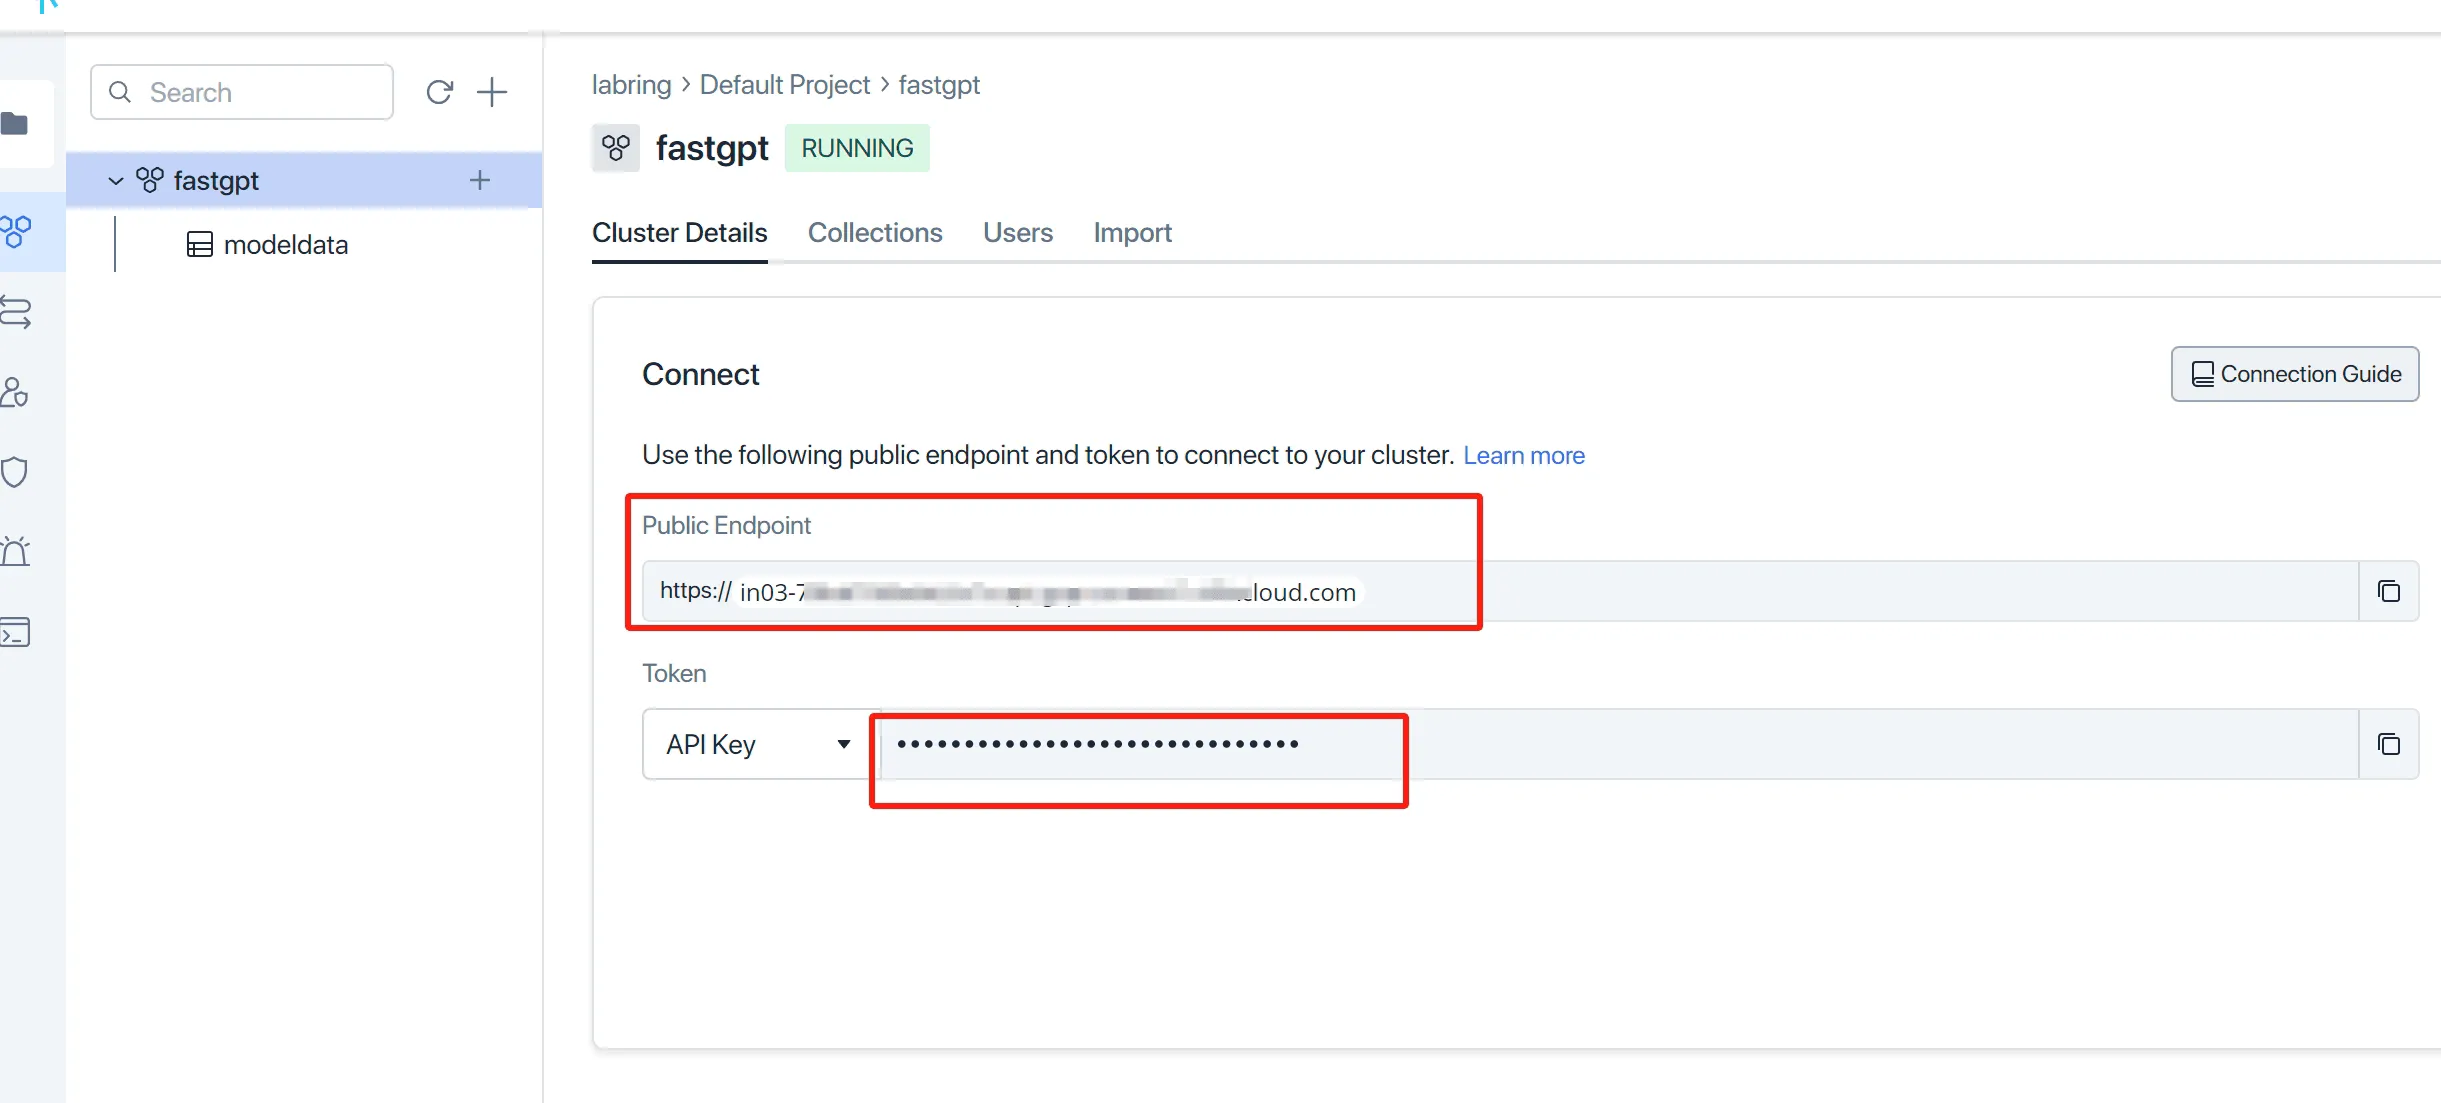
- Set
MILVUS_ADDRESSandMILVUS_TOKENto match Zilliz'sPublic EndpointandApi key. Remember to add your IP to the whitelist.
Post-Deployment Operations and Troubleshooting
- Routine Operations: See Environment Variables to customize container variables, Modify and Reset Root Password to update administrator credentials, Upgrade Instructions before upgrading across releases, and Migrate MongoDB 5.x to 8.x (Dump/Restore) when migrating the bundled MongoDB 5.x container.
- Troubleshooting: For component version compatibility, S3 connection errors, MongoDB replica set initialization,
relation "modeldata" does not exist,Illegal instruction, or port conflicts, see General Troubleshooting.
Last updated