
Deploy with Docker Compose
Quickly deploy FastGPT using Docker Compose
Prerequisites
- Basic networking knowledge: ports, firewalls, etc.
- Docker and Docker Compose basics
Deployment Architecture
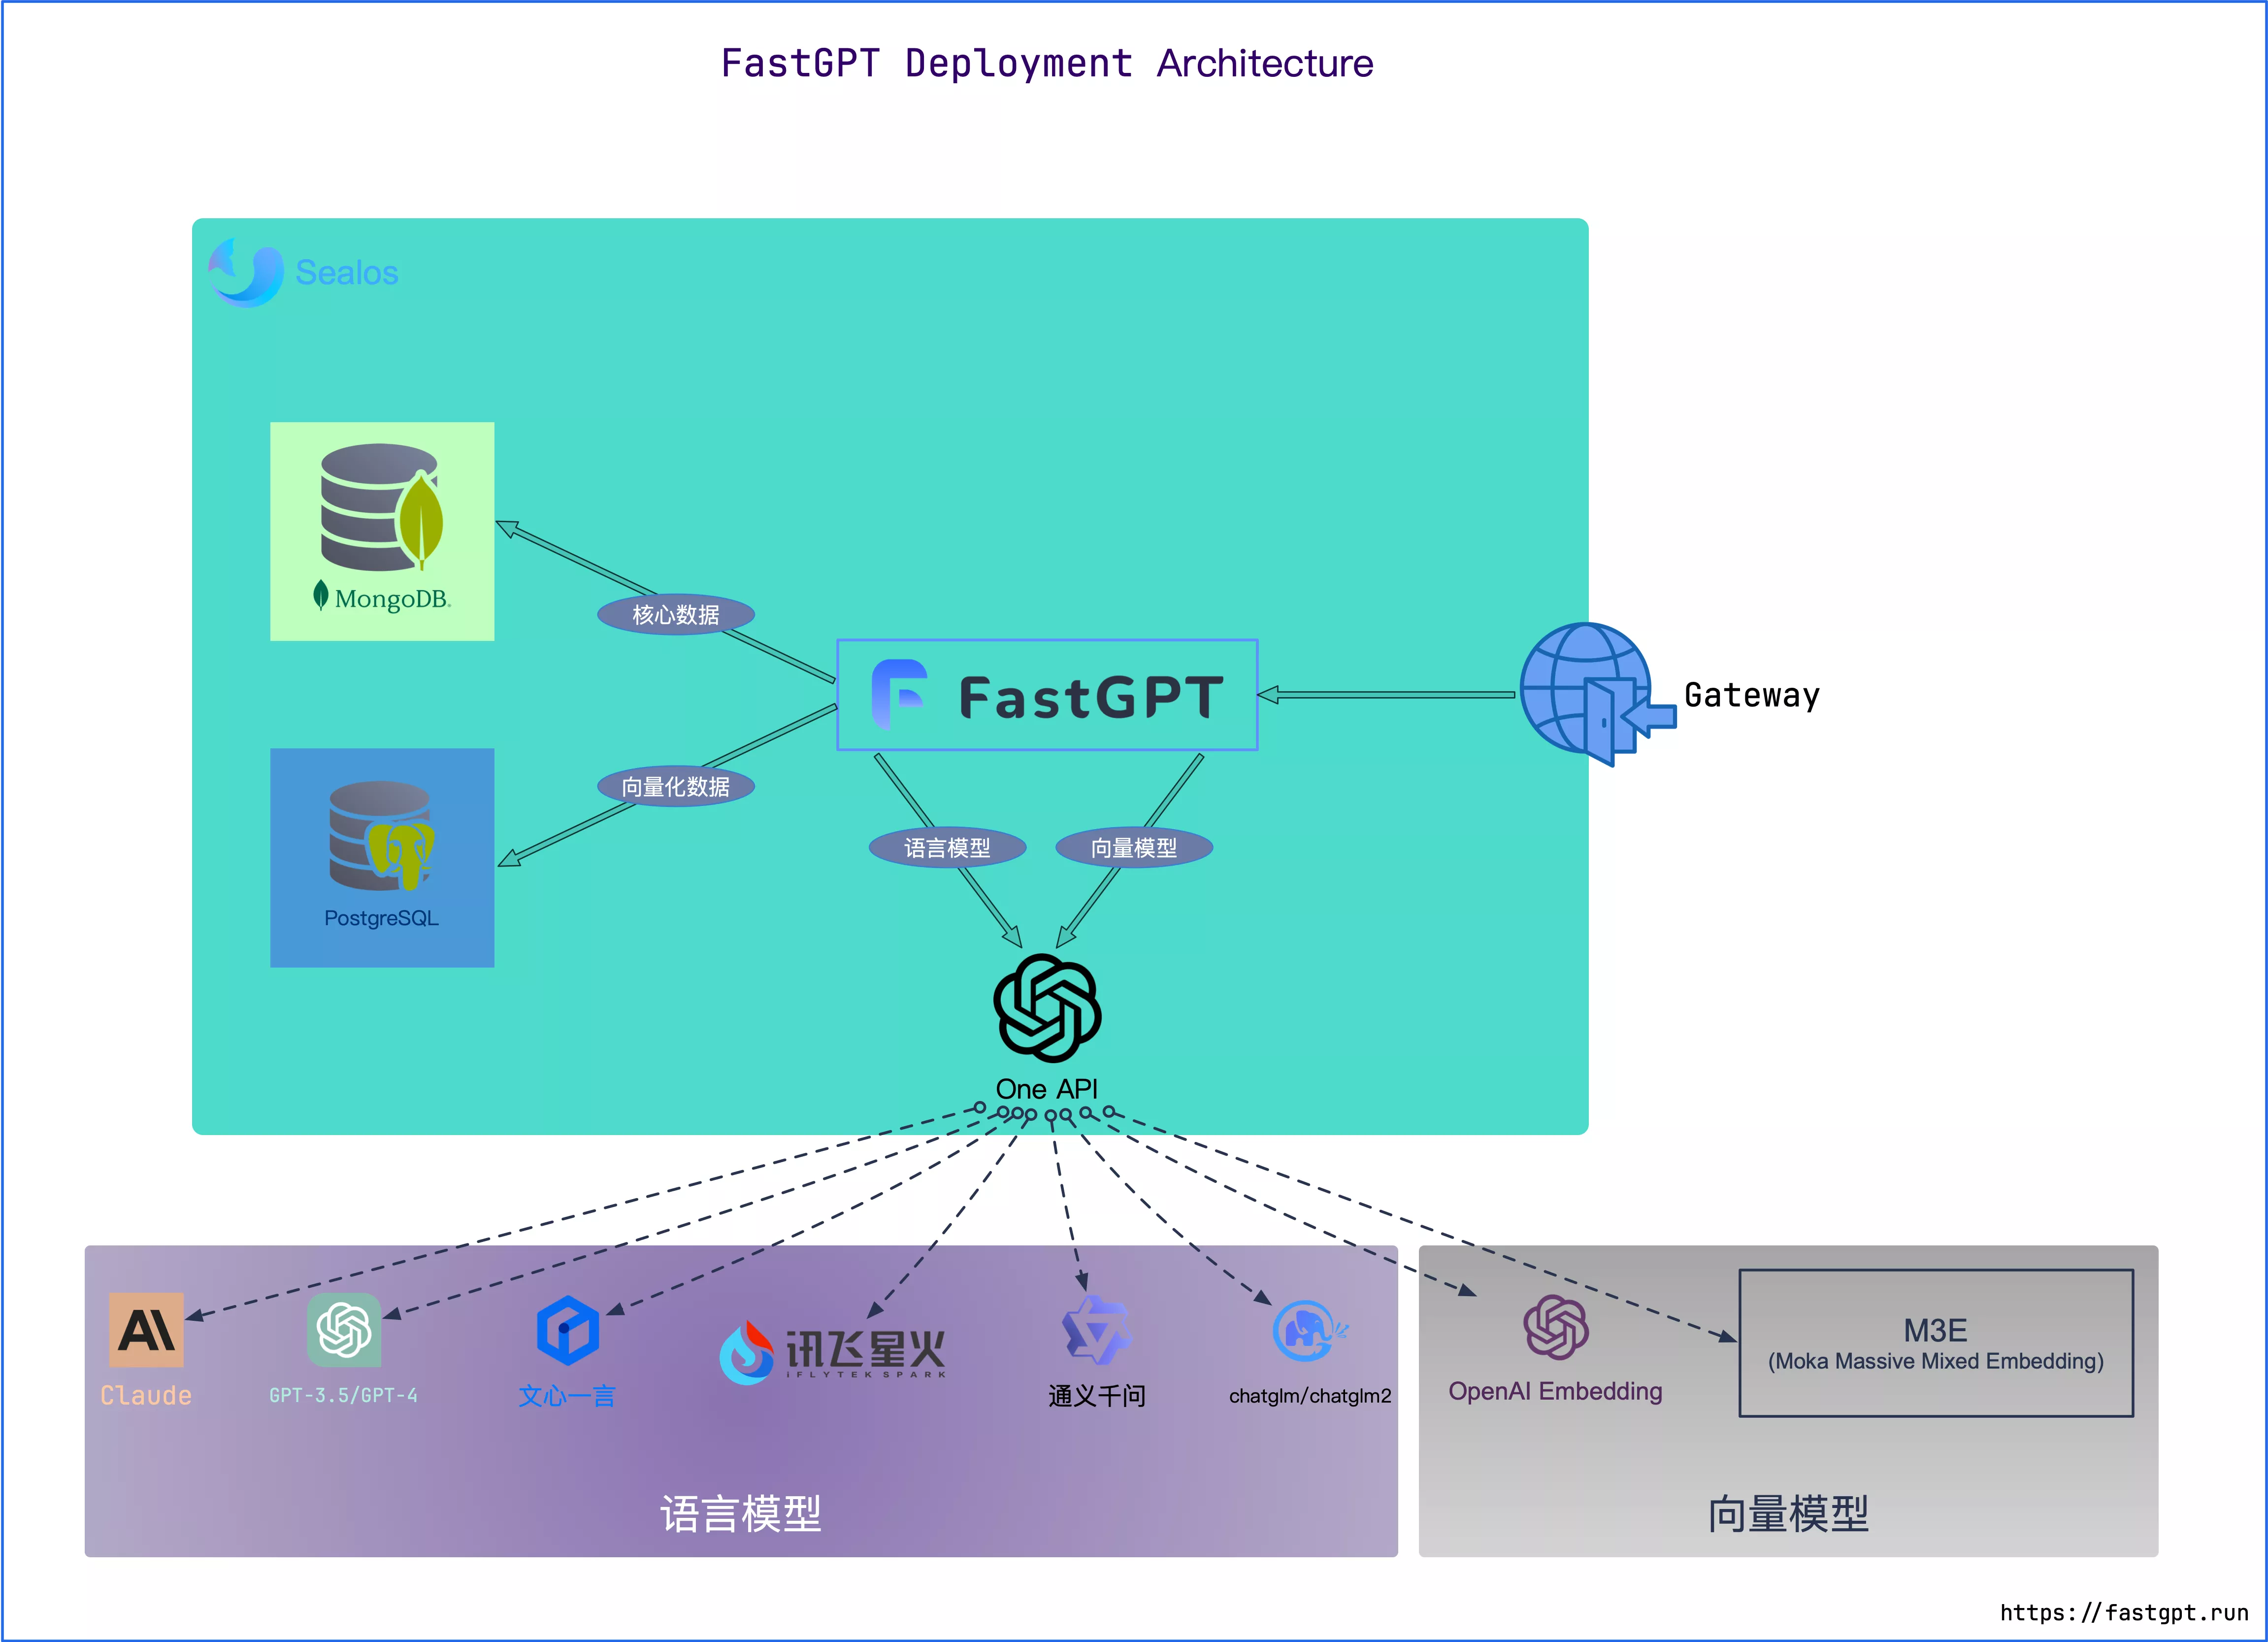
- MongoDB: Stores all data except vectors
- PostgreSQL/Milvus/Oceanbase/SeekDB: Stores vector data
- AI Proxy: Required for proxying model requests and managing providers in the Admin interface.
Recommended Specs
PgVector Version
Very lightweight, suitable for a Dataset index capacity below 50 million.
| Environment | Minimum (Single Node) | Recommended |
|---|---|---|
| Testing (reduce compute processes) | 2c4g | 2c8g |
| 1M vector groups | 4c8g 50GB | 4c16g 50GB |
| 5M vector groups | 8c32g 200GB | 16c64g 200GB |
Milvus Version
Better performance for 100M+ vectors.
View Milvus official recommended specs
| Environment | Minimum (Single Node) | Recommended |
|---|---|---|
| Testing | 2c8g | 4c16g |
| 1M vector groups | Not tested | |
| 5M vector groups |
Zilliz Cloud Version
Zilliz Cloud is built by the Milvus team — a fully managed SaaS vector database with better performance than Milvus and SLA guarantees. Try Zilliz Cloud.
Since the vector database runs in the cloud, no local resources are needed.
SeekDB Version
SeekDB is a high-performance vector database based on MySQL protocol, fully compatible with OceanBase, supporting efficient vector retrieval.
| Environment | Minimum (Single Node) | Recommended |
|---|---|---|
| Testing (reduce compute processes) | 2c4g | 2c8g |
| 1M vector groups | 4c8g 50GB | 4c16g 50GB |
| 5M vector groups | 8c32g 200GB | 16c64g 200GB |
SeekDB uses MySQL protocol, fully compatible with OceanBase:
- Supports 1536-dimensional vector retrieval
- Built-in HNSW index algorithm
- Batch insert and query rewriting
- Automatic retry and connection pool management
Preparation
Prepare Docker Environment
# Install Docker
curl -fsSL https://get.docker.com | bash -s docker --mirror Aliyun
systemctl enable --now docker
# Install docker-compose
curl -L https://github.com/docker/compose/releases/download/v2.20.3/docker-compose-`uname -s`-`uname -m` -o /usr/local/bin/docker-compose
chmod +x /usr/local/bin/docker-compose
# Verify installation
docker -v
docker compose -v
# If it fails, search online for solutions
We recommend Orbstack. Install via Homebrew:
brew install orbstackOr download the installer directly.
We recommend storing source code and data in the Linux filesystem when binding to Linux containers, not the Windows filesystem.
You can install Docker Desktop with WSL 2 backend on Windows.
Or install the command-line version of Docker directly in WSL 2.
Start Deployment
1. Get Configuration Files
Method 1: Deploy with an AI Agent
Copy the following content to your Coding Agent:
Refer to https://doc.fastgpt.cn/deploy/SKILL.md and deploy FastGPT with Docker for me.Method 2: Interactive Script Deployment
Run in Linux/MacOS/Windows WSL. The script guides you through selecting deployment environment, vector database version, IP address, etc.
FASTGPT_DEPLOY_BASE_URL=https://doc.fastgpt.cn bash <(curl -fsSL https://doc.fastgpt.cn/deploy/install.sh)If the documentation site uses a custom domain, an internal domain, or a local address, set FASTGPT_DEPLOY_BASE_URL to choose the download source. You can provide either the site root or a URL ending in /deploy; the script downloads YAML and config.json from that source:
FASTGPT_DEPLOY_BASE_URL=https://doc.fastgpt.cn bash <(curl -fsSL https://doc.fastgpt.cn/deploy/install.sh)Non-interactive mode also requires FASTGPT_FE_DOMAIN, the full URL users use to access FastGPT, such as https://fastgpt.example.com.
Versions with Agent/Skill Sandbox also require FASTGPT_SANDBOX_PROXY_URL, the Sandbox WebSocket URL, such as wss://sandbox-proxy.example.com;
Versions 4.16 and later also require FASTGPT_SANDBOX_PREVIEW_PROXY_URL for the HTTP preview URL.
Access URLs and host ports are configured independently. For direct access, set FASTGPT_PORT for the FastGPT host port (default 3000) and FASTGPT_SANDBOX_PROXY_PORT for the Sandbox Proxy host port (default 3006); the container ports remain 3000 and 1006. With a reverse proxy, public ports in FASTGPT_FE_DOMAIN, FASTGPT_SANDBOX_PROXY_URL, and the preview URL (for example, 443) are not treated as host ports, so the script keeps the default Compose mappings.
The script automatically performs the following actions:
- Downloads
docker-compose.yml. - Guides you through selecting externally accessible S3 and MCP addresses, then writes them into the config files.
- Generates a random
rootlogin password, service tokens, app keys, and component passwords, then writes them intodocker-compose.yml. - Detects the host Docker socket path and updates the mount path in
docker-compose.ymlwhen needed.
After the script finishes, the terminal prints the generated root login password. Keep the generated docker-compose.yml safe. For future upgrades, start from this file so you do not lose the generated passwords and keys.
To use an existing local docker-compose.yml file, for example when testing a version that has not been published to the docs site yet, choose Local docker-compose.yml in the deployment version step and enter the local file path. You can also pass the path with an environment variable:
FASTGPT_LOCAL_COMPOSE_PATH=/path/to/docker-compose.yml bash <(curl -fsSL https://doc.fastgpt.cn/deploy/install.sh)Method 3: Manual Download
If you need to pin deployment to a specific docker-compose.yml file, we recommend downloading both docker-compose.yml and install.sh, then using the script's local compose mode to generate the final config. This keeps the script's random credential generation, S3/MCP address updates, and Docker socket detection.
- Download the required
docker-compose.ymlfile to the server, for example:
curl -fsSL https://doc.fastgpt.cn/deploy/docker/main/cn/docker-compose.pg.yml -o docker-compose.source.ymlClick to view docker-compose config file download links for different databases
- Pgvector
- China mirror (Alibaba Cloud): docker-compose.pg.yml
- Global mirror (dockerhub, ghcr): docker-compose.pg.yml
- Oceanbase
- China mirror (Alibaba Cloud): docker-compose.oceanbase.yml
- Global mirror (dockerhub, ghcr): docker-compose.oceanbase.yml
- Milvus
- China mirror (Alibaba Cloud): docker-compose.milvus.yml
- Global mirror (dockerhub, ghcr): docker-compose.milvus.yml
- Zilliz
- China mirror (Alibaba Cloud): docker-compose.zilliz.yml
- Global mirror (dockerhub, ghcr): docker-compose.zilliz.yml
- SeekDB
- China mirror (Alibaba Cloud): docker-compose.seekdb.yml
- Global mirror (dockerhub, ghcr): docker-compose.seekdb.yml
- Download
install.shto the server:
curl -fsSL https://doc.fastgpt.cn/deploy/install.sh -o install.sh- Run
install.shwith the local compose file to generate the final deployment config:
FASTGPT_LOCAL_COMPOSE_PATH=./docker-compose.source.yml bash install.shThe script copies this compose file to the final docker-compose.yml, then generates login passwords and credentials, and writes the S3/MCP addresses. After generation, log in with the root password printed in the terminal.
For a fully offline environment, prepare docker-compose.yml and install.sh in advance. If the script cannot run, manually update DEFAULT_ROOT_PSW, service tokens, database passwords, and S3/MCP addresses.
Deploy with a Custom Image Registry
If you use an internal Harbor, private registry, or image mirror, download docker-compose.yml first, replace all image: values with your own registry addresses, and then use local compose mode:
FASTGPT_LOCAL_COMPOSE_PATH=./docker-compose.yml bash install.shIf Agent/Skill Sandbox is enabled, also replace the sandbox-related images in the Compose file and update AGENT_SANDBOX_SEALOS_IMAGE or AGENT_SANDBOX_OPENSANDBOX_IMAGE so the sandbox provider can pull the matching images. See OpenSandbox Configuration for details.
2. Modify Environment Variables
You must set FE_DOMAIN in fastgpt-app to the full URL users use to access FastGPT, such as https://fastgpt.example.com. It must include a scheme, host, and optional port; do not leave it empty or use an internal container address.
When Agent/Skill Sandbox is enabled, also configure:
AGENT_SANDBOX_PROXY_URL: the browser-accessible Sandbox Proxy WebSocket URL usingws://orwss://, such aswss://sandbox-proxy.example.com, which must be forwarded to the Sandbox Proxy host port (default3006).- Version 4.16 additionally requires
AGENT_SANDBOX_PREVIEW_PROXY_URL: the browser-accessible HTTP(S) URL for sandbox file previews, such ashttps://sandbox-proxy.example.com, forwarded to the same host port.
The interactive install script prompts for these addresses before the final confirmation.
For Zilliz version, you also need credentials — see Deploy Zilliz Version: Get Account and Credentials. Other versions can skip to the next step.
3. Open External Ports / Configure Domain
The following services must be reachable. For direct access, open the host ports printed by the script; with a reverse proxy, the proxy owns the public ports:
- Port 3000 by default (FastGPT main service; change the host port with
FASTGPT_PORT) - Port 9000 (S3 service)
- Port 3006 by default (FastGPT Agent Sandbox Proxy service; change the host port with
FASTGPT_SANDBOX_PROXY_PORT) - Port 3003 (FastGPT SSE MCP server service; you can leave this port closed if you don't need it.)
4. Start Containers
Run in the same directory as docker-compose.yml. Ensure docker-compose version is 2.17+, or automated commands may fail.
# Pre-pull all service and sandbox runtime images
docker compose --profile prepull pull

# Start containers
docker compose up -d
5. Access FastGPT
Access FastGPT via the port/domain opened in step 3.
Login username is root, password is the DEFAULT_ROOT_PSW set in docker-compose.yml environment variables.
If you deploy with the interactive script, it randomly generates DEFAULT_ROOT_PSW and prints the login password when it finishes. If you deploy manually, change the default password in docker-compose.yml before starting the service. Each container restart automatically updates the root user's password based on DEFAULT_ROOT_PSW.
6. Configure Models
- After first login, the system prompts that
Language ModelandEmbedding modelare not configured and automatically redirects to the model configuration page. At least these two model types are required. - If the redirect doesn't happen, go to
Admin - Model providerto configure models. View tutorial - Known issue: after first entering the system, the browser tab may become unresponsive. Close the tab and reopen it.
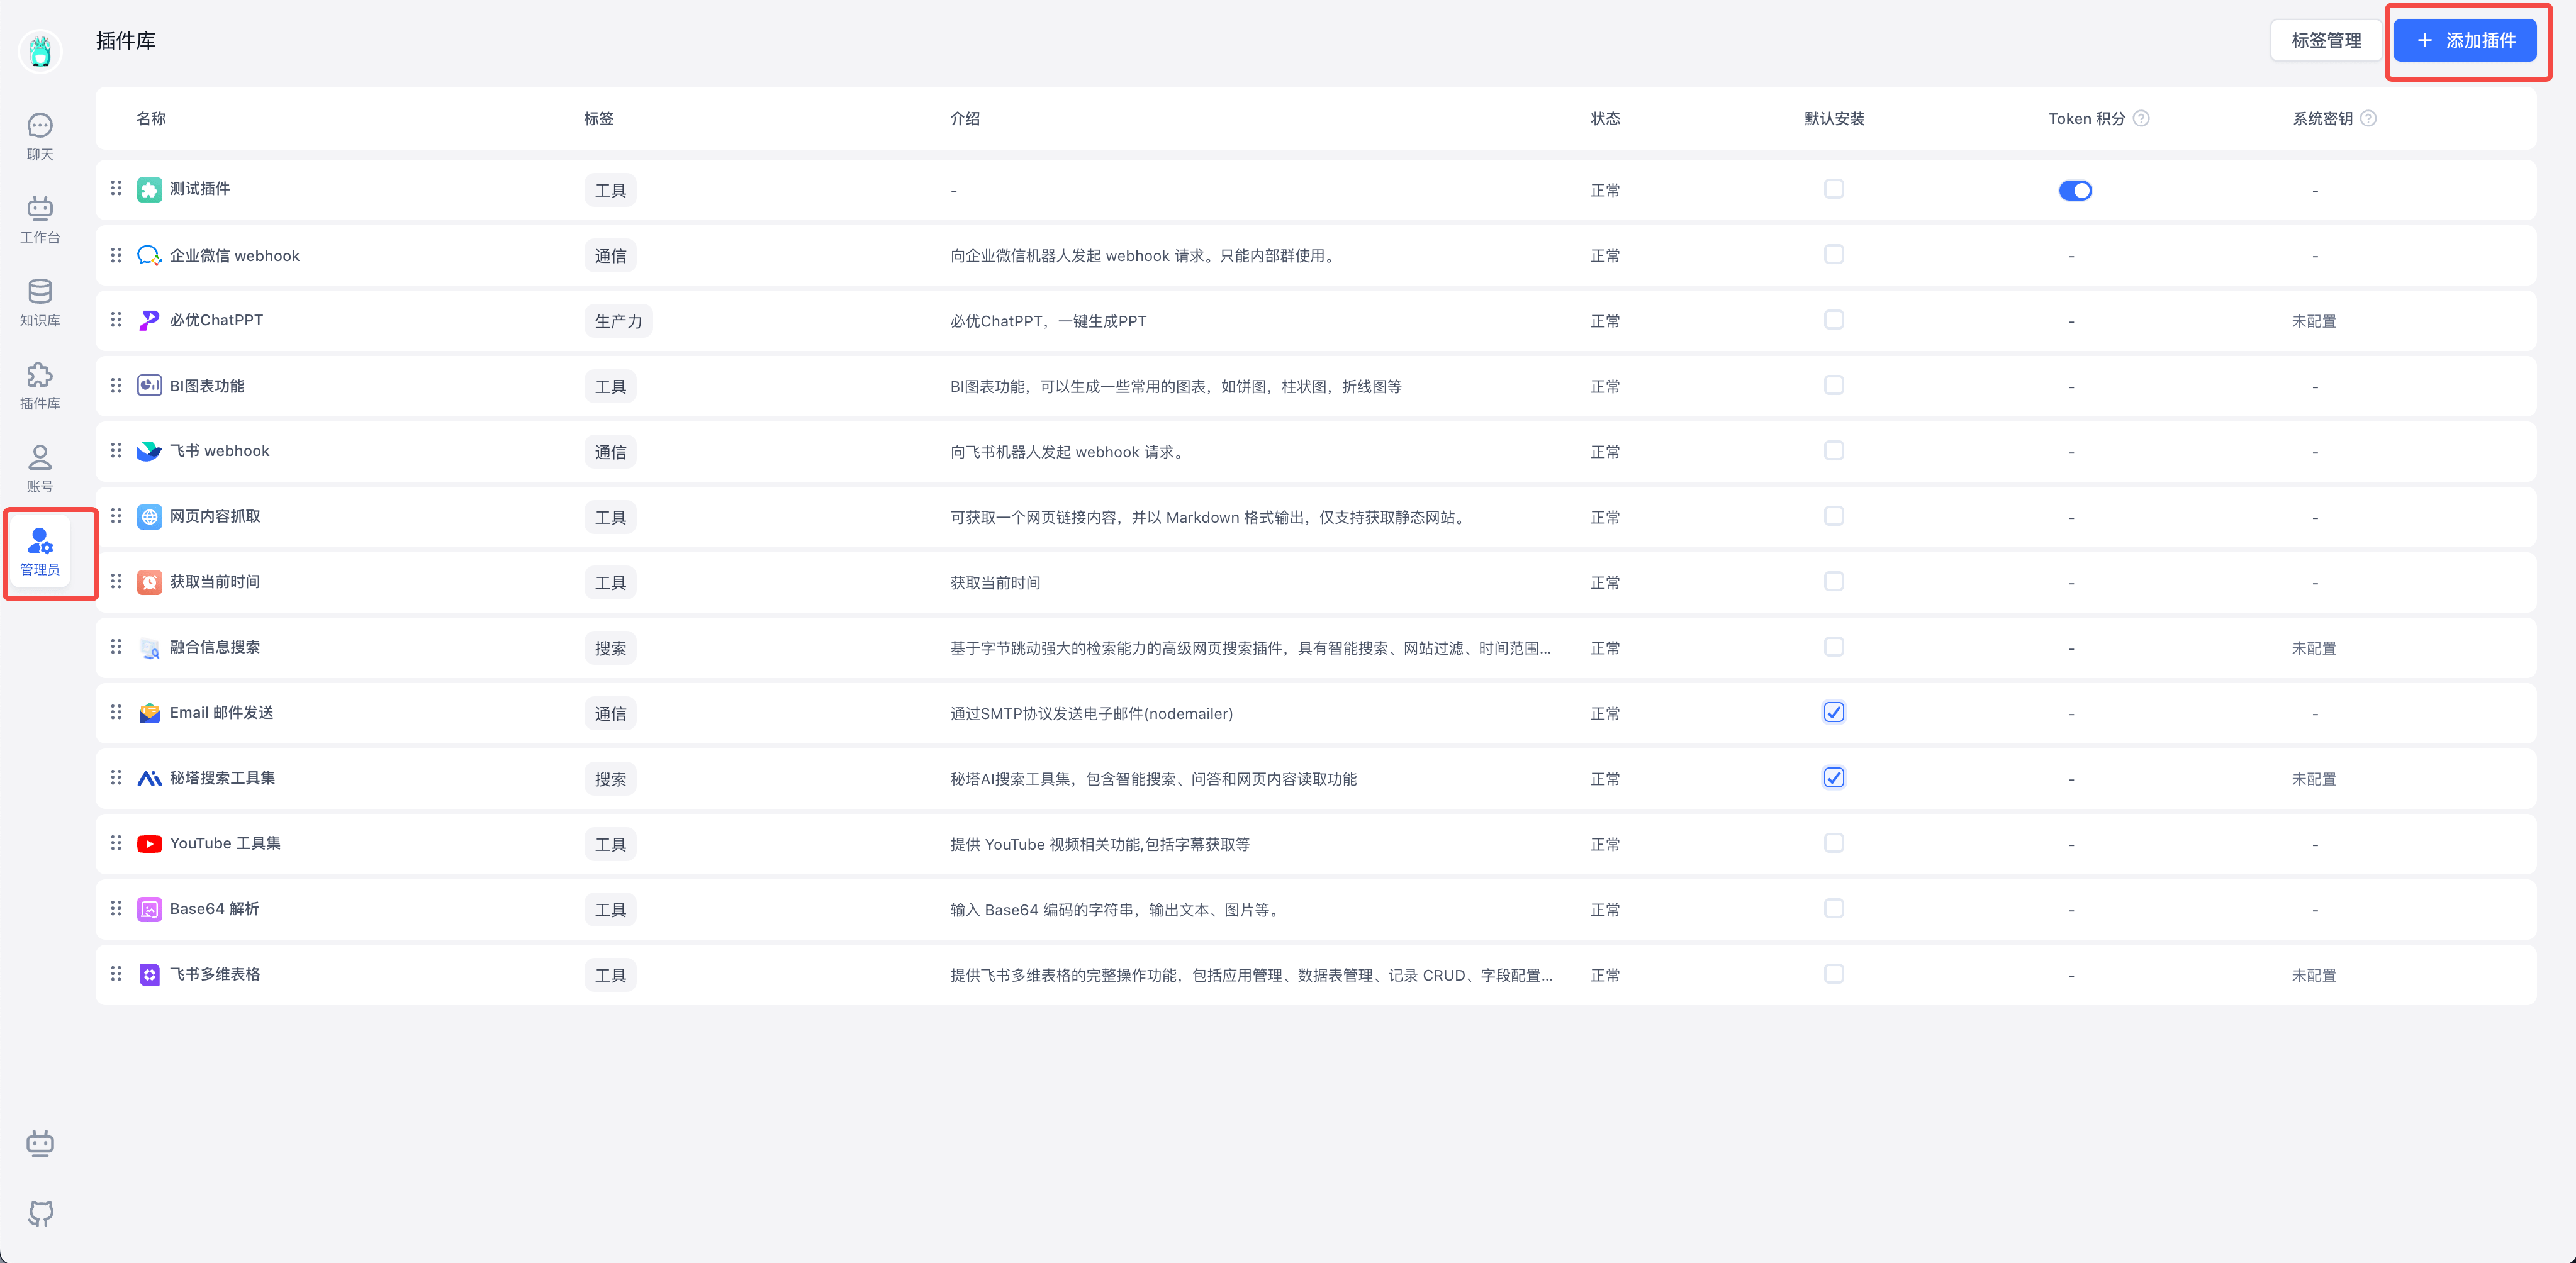
7. Install System Plugins as Needed
Starting from V4.14.0, the fastgpt-plugin image only provides the runtime environment without pre-installed system plugins. All FastGPT systems must manually install system plugins.
- Install via the plugin marketplace — by default it fetches from the public FastGPT Marketplace.
- If your FastGPT can't access the marketplace, visit FastGPT Plugin Marketplace, download .pkg files, and import them via file upload.
- You can also sort tools, set default installations, and manage tags.
FAQ
FastGPT and FastGPT-plugin Version Compatibility
| FastGPT-plugin Version | FastGPT Main Service |
|---|---|
| 1.x | 4.15.x |
| 0.6.x | >= 4.14.11, < 4.15.0 |
| 0.5.x | >= 4.14.6, < 4.14.11 |
| < 0.5.0 | < 4.14.6 |
S3 Connection Issues
Check the STORAGE_EXTERNAL_ENDPOINT variable — it must be accessible by both the client and FastGPT service.
Important:
Don't use
127.0.0.1orlocalhostor other loopback addresses. Use the host machine's local IP when deploying with Docker, but set it to a static IP; or use a fixed domain name. This prevents 403 errors caused by URL mismatches when signing object storage URLs.
Browser Unresponsive After Login
Can't click anything, refresh doesn't help. Close the tab and reopen it.
Mongo Replica Set Auto-Initialization Failed
The latest docker-compose examples have fully automated Mongo replica set initialization. Tested on Ubuntu 20/22, CentOS 7, WSL2, macOS, and Windows. If it still won't start, the CPU likely doesn't support AVX instructions — switch to Mongo 4.x.
To manually initialize the replica set:
- Create a mongo key in the terminal:
openssl rand -base64 756 > ./mongodb.key
chmod 600 ./mongodb.key
# Change key permissions — some systems use admin, others use root
chown 999:root ./mongodb.key- Modify docker-compose.yml to mount the key:
mongo:
  #  image: mongo:5.0.18
  # image: registry.cn-hangzhou.aliyuncs.com/fastgpt/mongo:5.0.18 # Alibaba Cloud
  container_name: mongo
  ports:
    - 27017:27017
  networks:
    - fastgpt
  command: mongod --keyFile /data/mongodb.key --replSet rs0
  environment:
    # Default username and password, only effective on first run
    - MONGO_INITDB_ROOT_USERNAME=myusername
    - MONGO_INITDB_ROOT_PASSWORD=mypassword
  volumes:
    - ./mongo/data:/data/db
- ./mongodb.key:/data/mongodb.key- Restart services:
docker compose down
docker compose up -d- Enter the container and initialize the replica set:
# Check if mongo container is running
docker ps
# Enter container
docker exec -it mongo bash

# Connect to database (use your Mongo username and password)
mongo -u myusername -p mypassword --authenticationDatabase admin

# Initialize replica set. For external access, add directConnection=true to the Mongo connection parameters
rs.initiate({
  _id: "rs0",
  members: [
    { _id: 0, host: "mongo:27017" }
  ]
})
# Check status — if it shows rs0 status, it's running successfully
rs.status()
How to Change API Address and Key
Starting with V4.17.0, you must deploy or connect to AI Proxy and set these environment variables in the FastGPT container:
AIPROXY_API_ENDPOINT: The AI Proxy service root URL reachable from FastGPT, such ashttp://aiproxy:3000. Do not append/v1; FastGPT adds the path required by each API.AIPROXY_API_TOKEN: A nonempty AI Proxy administrator token that matches the administrator credentials configured on the AI Proxy server.
Startup validation fails if either setting is missing. OPENAI_BASE_URL and CHAT_API_KEY do not replace these required settings. AI Proxy is still required when a model uses requestUrl/requestAuth. Configure model service endpoints and keys in the Admin provider settings.
To update the AI Proxy connection, edit the FastGPT container's environment variables in docker-compose.yml. Commercial Admin services that share App/Service configuration also need both variables.
After modifying, restart:
docker compose down
docker compose up -d
How to Update Versions?
-
Check the update documentation to confirm the target version — avoid skipping versions.
-
Change the image tag to the target version
-
Run these commands to pull and restart:
docker compose up -d -
Run initialization scripts (if any)
How to Customize Environment Variables?
Edit the environment section of fastgpt-app in docker-compose.yml, then run docker compose up -d to restart the container. For details, see Environment Variables.
How to Check if Environment Variables Loaded
docker exec -it fastgpt shto enter the container.- Run
envto view all environment variables.
Why Can't I Connect to Local Model Images
docker-compose.yml uses bridge mode to create the fastgpt network. To access other images via 0.0.0.0 or image name, add those images to the same network.
How to Resolve Port Conflicts?
Docker-compose port format: mapped_port:running_port.
In bridge mode, container running ports don't conflict, but mapped ports can. Change the mapped port to a different value.
If container1 needs to connect to container2, use container2:running_port.
(Brush up on Docker basics as needed)
relation "modeldata" does not exist
PG database not connected or initialization failed — check logs. FastGPT initializes tables on each PG connection. Errors will appear in the logs.
- Check if the database container started normally
- For non-Docker deployments, manually install the pg vector extension
- Check fastgpt logs for related errors
Illegal instruction
Possible causes:
- ARM architecture — use the official Mongo image: mongo:5.0.18
- CPU doesn't support AVX — switch to mongo4.x. Change the mongo image to: mongo:4.4.29
Operation auth_codes.findOne() buffering timed out after 10000ms
Mongo connection failed — check mongo's running status and logs.
Possible causes:
- Mongo service didn't start (some CPUs don't support AVX — switch to mongo4.x, find the latest 4.x on Docker Hub, update the image version, and rerun)
- Database connection environment variables are wrong (username/password, check host and port — for non-container network connections, use public IP and add directConnection=true)
- Replica set startup failed, causing the container to keep restarting
Illegal instruction.... Waiting for MongoDB to start: CPU doesn't support AVX — switch to mongo4.x
First Deployment: Root User Shows Unregistered
Logs will show error messages. Most likely Mongo replica set mode wasn't started.
Can't Export Dataset / Can't Use Voice Input or Playback
SSL certificate not configured — some features require it.
Login Shows Network Error
Caused by service initialization errors triggering a restart.
- 90% of cases: incorrect config file causing JSON parsing errors
- The rest: usually because the vector database can't connect
How to Change Password
Modify DEFAULT_ROOT_PSW in docker-compose.yml and restart — the password auto-updates.
Deploy Zilliz Version: Get Account and Credentials
Open Zilliz Cloud, create an instance, and get the credentials.

- Set
MILVUS_ADDRESSandMILVUS_TOKENto match Zilliz'sPublic EndpointandApi key. Remember to add your IP to the whitelist.
File Updated